


Specifications for the Polini Thor models
Most troubleshooting, assembly, & tips are the same as with the Top 80.
General
Carburetor – The Thor 100 and 130 use the WG. The Thor 190 and 200 use the WB. The Thor 250 uses the Polini carburetor.
Carburetor jet sizes – Thor 100 #116 (?), Thor 130 #130
Compression, engine – 130-150 psi, depending on altitude. This is what you can expect for a new engine. Used will be less.
Cylinder base gasket – thickness 0.5mm, install gasket with the lettering facing down. Never use sealant on engine gaskets. It is unnecessary (manifold gaskets are the only exception)
Cylinder decompression port cleaning – use a #39 or 2.5mm bit. There are (2) holes that go from the cylinder to the exhaust port. The head gasket must be removed.
Cylinder head gasket – install with the ridge on the gasket UP
Cylinder Head Temperatures – running & maximum (for brief periods <1 minute):
Thor 80 running 55C° max 95C° (water cooled)
Thor 100 running 230C°-250C° max 265C°-280C°
Thor 130 running 230C°-250C° max 265C°-280C°
Thor 130 EVO running 230C°-250C° max 265C°-280C°
Thor 190 Light running 200C°-230°C max 250C°-260°C
Thor 190 EVO running 200C°-230°C max 250C°-260°C
Thor 200 running 230C°-250C° max 265C°-280C°
Thor 200 EVO running 230C°-250C° max 265C°-280C°
Thor 250
Fuel filter Info – Use a 10 micron inline filter.
Fuel line/tubing size – Use Tygon® LP1100 Low Permeation Fuel Tubing (ethanol resistant). It is available from Miniplane-USA. Do NOT use ordinary vinyl tubing as it will become stiff quickly and stress the connections on the tank and engine. Auto parts stores do NOT have the right type.
- carburetor to inline filter to fuel tank ID 4.8mm (3/16") x OD 8mm (5/16")
Fuel pump vacuum – 5" Hg (dry) 7" Hg (wet w/ fuel)
Fuel Info – Note: The Polini manual specifies that pilots use unleaded fuel (the only kind available to pilots in the EU). We contacted Polini and they specifically stated in writing (available on request) that pilots may use AVGAS in any of their engines. However, we no longer recommend AVGAS because of the problems of deposits fouling the cylinder head and piston, including ring sticking.
Ignition, coil – The official Polini user manual states that the spark plug boot terminal to ground is 5K Ohms. Some Thor models may have greater values.
Ignition coil primary resistance (all models except the 190) – 1K Ohms (blue wire to engine ground). If you get no value switch the Ohmmeter leads. If the value is greater than 1K Ohms, the coil may be OK but, if it is not giving a spark or a weak spark, consider replacing the coil.
Ignition coil secondary resistance – 9K Ohms ±10% (spark plug terminal to engine ground) Can be 5K Ohms on newer models.
Ignition magneto coil resistance – 290 Ohms
Ignition magneto voltage output – see the Ignition troubleshooting page on how to measure this AC voltage
Magneto – see "Ignition magneto voltage output" above
Mounts, engine – 30mmL x 30mmW x 8mm (stud x socket) There are (4) mounts, total
Muffler spring removal – Use paraglider line to stretch the springs for replacement/removal. Do NOT use pliers to stretch the springs because this will nick the tempered surface of the spring and weaken it. Here is a video on how to properly do it
Power output
- Thor 100 20.5 @ 8,900 RPM
- Thor 130 21.5 HP @ 8,800 RPM
- Thor 190 27 HP @ 7,400 RPM
- Thor 200 29 HP @ 7,400 RPM
- Thor 250 36 HP @ 7,500 RPM (Dual Spark engine 36.5 HP)
Propeller shaft, seal – 26 x 36 x 7 mm
Redrive oil – Here is a list of the correct oils that may be used in the Thor redrive.
Reed valve – if the petals get weak, chip, or break into pieces the engine will not achieve full power or may not run or start.
Spark plug (other than the Thor 250) – NGK BR10EG, gap 0.9mm (0.035") Pilots may also use non-resistor plugs e.g. B10EG/ES or B9EG/ES. The "EG" series plugs are designed specifically for 2-stroke engines and also reduce fouling but cost more. Use of a non-resistor plug will only increase the amount of noise created by the ignition that may be picked up by a two-way radio. Note: for screw on terminals only, be sure to put the terminal on with RED THREADLOCK or it will loosen and self destruct. The inside of the spark plug boot may also be damaged.
Spark plug for the Thor 250 – see the Thor 250 page
Special tools for the Thor engines. These include the special pullers used to disassemble the engine.
Starter cord – 1.8m (6') When cord is fully installed, wind the spool 3X to ensure adequate tension on the cord which keeps the pulley out of the propeller.
Starter cord pulleys – Harken 082 (superior to the OEM Viadana)
Starter mounting screws – (3) 5mm x 80mm and (1) mm x 25mm. However, the bottom 80mm screw should be replaced with a 90mm screw and locknut.
Torque values Thor engines
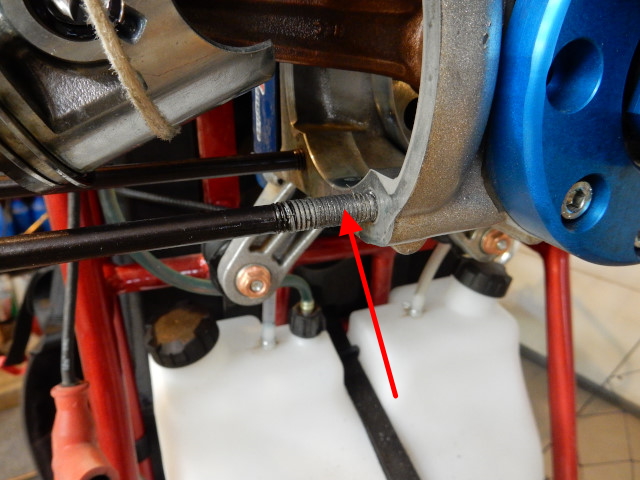
WARNING! WARNING! WARNING! The bracket which connects the engine to the two lower mounts on the frame WILL eventually loosen.
If you don't think you need to learn how to use a torque wrench, check this photo of a cylinder head stud that was pulled right out of the aluminum crankcase by applying too much torque to the cylinder head nut. The threaded hole in the crankcase was ruined. It was an expensive mistake for the owner of this engine. For help, take a look at this video on torque.
Polini torque values for various parts
Carburetor screws 6mm – 8 Nm
Compression relief valve – 10 Nm
Crankcase screws 6mm – 8 Nm
Crankshaft nut, clutch side – 60 Nm
Crankshaft nut, starter side – 40 Nm
Cylinder head nuts – be sure to re-torque head nuts after the engine has run a few hours
- 7mm Thor 100,130 – 14 Nm
- 6mm Thor 200 – 12 Nm
- 8mm Thor 200 – 18 Nm
Engine to frame button-head screws 8 Nm – 10 Nm – use Blue threadlock
Exhaust stud nuts 6mm – 10 Nm – use RED threadlock.
Magneto bolts – 9 Nm
Muffler button-head screws 8mm – 10 Nm – use BLUE threadlock
Propeller central screw – 40 Nm
Reed valve screws – 8 Nm
Spark Plug – 20 Nm DO NOT USE THREADLOCK ON SPARK PLUGS!
Starter mounting screws – 2-3 Nm It is easy to over-torque these screws. Threadlock is not necessary on these screws.
Maintenance intervals
General instructions
Changing the redrive oil and the spark plug are the (2) most important maintenance items that must be done. Use a Sharpie to write reminders on the top of the redrive (or
other semi-flat area). Any other method will not be as effective. The markings are easily removed with brake cleaner or mineral spirits. This way, you won't forget! You have an
hour meter/tachometer installed right?
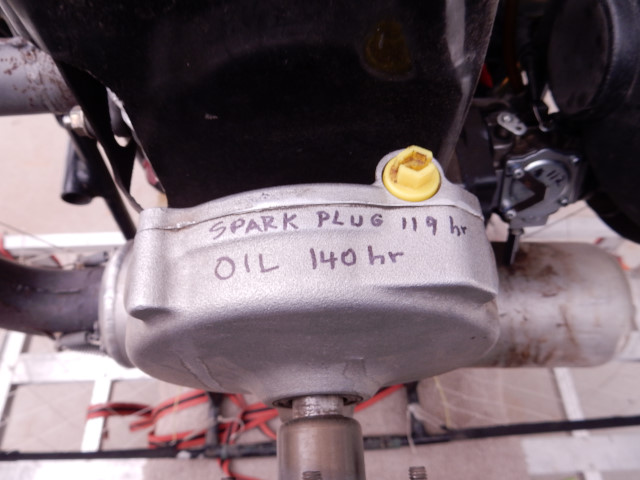
A. REDRIVE SERVICING It is very important to change the redrive oil on schedule because it gets quickly contaminated with clutch material. If your clutch oil appears really black when you change it, increase the change frequency. Note that the redrive will use oil because of slight leaks out of the relief valve and why it should be changed often.
B. Below are service items that are particular for the Polini. Pilots would do well to carefully study the servicing intervals for the Top 80 which I have developed to ensure long engine life for any 2 stroke aviation engine. The carburetor and fuel system are the most common items that must have regular service. Failure to regularly service the carburetor can result in permanent engine damage.
C. The Polini Thor Flash starter is a disaster. See the Flash starter page for more information. Later models may have fewer problems, hopefully.
First 10 hours
- Change redrive oil The exhaust assembly should be removed to get access to the drain plug. Use a cord to remove the exhaust springs. Remove the two button-head screws that hold the exhaust assembly to the frame.
- Starter – Replace the entire starter with a clone. If you don't, you will wish you had. We have spent dozens of hours attempting to fix this mess but there is always some new quirk that causes the starter to disintegrate -- at the most inconvenient times!
Every year (minimum)
- Rebuild the carburetor The fuel pump will not work properly unless unless the carburetor is rebuilt.
- Replace the inline fuel filter.
- Change the oil in the redrive.
- Replace the spark plug.
- Check the ignition if there is any question about engine power
- Replace fuel system tubing if ethanol gasoline is used and they are stiff. Hardened tubing puts a great stress on connected parts.
- Check the torque of the cylinder head nuts, especially if you run your engine at or near sea level.
- Closely examine the ignition wiring and connectors and make sure there are no broken or loose wires.
Every 25 hours
- Replace spark plug DO NOT FORGET TO USE RED THREADLOCK ON THE TOP TERMINAL IF IT IS THE SCREW-ON TYPE! It WILL loosen. A bad plug will work fine until the engine is at or near wide open throttle. It will also be harder to start.
- Change redrive oil (change every year, at a minimum). Note: The drain plug can only be removed if the muffler assembly is removed. Remove the springs and the two button-head screws which attach the system to the engine. Tighten the oil fill plug on top of the redrive just snug. If you over-tighten the plug, the gasket will be ruined and it will constantly leak oil. When the gasket fails, a 11mm ID O ring will work even better. If you use an O ring, just snug the plug. The O ring will keep it well sealed and from loosening further.
- Replace muffler springs, as needed. They must be examined carefully for wear or damage.
- Clean air filter (if you fly at the beach or in a dusty environment, you may have to clean this filter more often)
- Flash starter – be sure it is not about to self-destruct. It will be more difficult to pull and may not catch well. If there are any doubts, take it off and inspect it. Don't say, "Had did not warn me!" when the starter blows up and destroys other engine parts e.g. the fan, the shroud, the pulleys, the propeller, and your nerves. See the Flash starter page for options much better than the flash. Chinese clone starterS can be had for about $12 i.e. "a throw-away starter" that works better and lasts longer.
- Starter pulleys – these pulleys are poor quality and will wear out quickly if not regularly lubricated with spray white lithium grease or light oil. See the link for quality options to these cheap pulleys from Italy.
Every 50 hours
- Check/replace rubber mounts on engine and exhaust system, as needed. Cracks in the rubber mounts may be difficult to see.
- Rebuild the carburetor if there are any changes in performance.
Every 100 hours – this is an important and extensive service of the engine. Everything may be fine for 150 hours but then maybe not....
- Check for loose engine/frame mounting bracket. This bracket WILL loosen! See this page for details and how to fix. Once this is fixed properly it will be unnecessary to check it again.
- Remove deposits from the top of piston and cylinder head. Alex Varv shows how to do it without removing the cylinder. However, I do not recommend using any sealant between the cylinder and cylinder head. I have never had a head leak when the "O" ring is new and installed properly.
- Replace air filter, as needed. If the filter is in good condition, clean it with soap and water. Never wring these filters to dry them!
- Replace starter rope if there is any signs of wear.
- Replace reed valve petals. You might get away not replacing them but if one breaks off it could damage the engine as it goes through it.
- Polini recommends that pilots replace the connecting rod bearing, the circlips, and the wrist pin. Here are tips on how to do this service. In order to do this, you must purchase the entire piston assembly. You cannot buy the wrist pin separately, only the bearing and (10) circlips. If the wrist pin has zero wear (as measured with a micrometer or digital caliper), you may replace jut the bearing ($11) and the circlips. DO NOT REUSE CIRCLIPS!!! You will have to purchase a gasket set, as well. If you installed the exhaust manifold correctly in the first place, you will not have to remove it from the cylinder. Note: Polini changes part numbers, minimum quantity, and whether the part must come in a set e.g. the widget is $1 but you have to buy 5 other items you do not need for $50, much like what American vehicle manufacturers do. It is very irritating....
Every 200 hours
- Replace piston and rings if they appear worn. If the cross-hatch pattern is largely missing from the cylinder wall, re-hone it or replace. Wear here will result in less engine output.
Every 400 hours
- Replace all bearings and seals, as needed. Wear of these parts will likely be shown by leaks around the front crankshaft seal and excessive play in the rear crankshaft bearing. You will have to remove clutch housing
- Replace crankshaft if play is excessive in the lower wrist pin bearing. Noisy engines probably need to be overhauled.
![]()

