


Reed valve issues
by Had Robinson
updated April 22, 2023
A. Discussion
Two stroke engines do not have intake or exhaust valves as in four stroke engines. When the piston moves up, a vacuum is created in the crankcase which is connected to the carburetor. Air/fuel is then sucked into the crankcase. When the piston goes down, pressure is created in the crankcase. If it were not for the reed valves, the air/fuel would be forced right back out the carburetor instead of being pushed up into the combustion chamber through a port that is opened when the piston goes up. The reed valve is located between the carburetor and the engine crankcase and its perfect operation is critical to the performance of the engine.
The reed valve consists of an aluminum body and petals which open and close against the valve body thousands of times a minute (see the last photo on this page for a detailed view of a typical reed valve).
As reed petals age, they loose their straightness, may break off, become chipped, and bend more easily. As a result they will not do their job. The idle speed and low speed jet cannot be adjusted properly, the engine may not idle at all (without throttle), start easily, nor reach full output. The engine may also "spit" at the carburetor and drip fuel excessively. If the petals break off, the engine may not run or start, depending on how much of the petals is missing. Polini, for example, recommends that pilots replace the petals every (100) hours. However, do not assume that if you have an engine that will not idle or has an erratic idle that the reed valve needs service. The usual cause of that the carburetor needs a rebuild.
It is easy to remove the carburetor on a paramotor and use a flashlight to observe the condition of the reed valve petals. This should be done when the carburetor is rebuilt.
ENGINES WITH AN INTERNAL PULSE PORT e.g. Top 80, newer Moster 185's
Some engines have a reed valve body with a special passageway or port that goes from the crankcase to the carburetor and then to the fuel pump diaphragm. This port transmits the pulses from the crankcase that operate the fuel pump. The port must not be obstructed with sealant or debris and must be air tight and not leak. If the reed valve body is loose and the port is leaking, the fuel pump will not work well.
I have found loose reed valve bodies on both brand new and used Top 80 engines. A new engine may run fine for a number of hours and then the screws that attach the reed valve body to the crankcase begin to loosen (because they were not torqued properly at the factory nor was threadlock applied to keep them from loosening). As things loosen, the fuel pump does not work as well and the pilot may notice "hiccups", especially near or at full throttle. When the problem gets severe, the engine will quit when the throttle is fully opened. Nonetheless, the engine may run OK at idle and at lower RPM because there is enough suction present in the carburetor throat to overcome a weak or failed fuel pump.
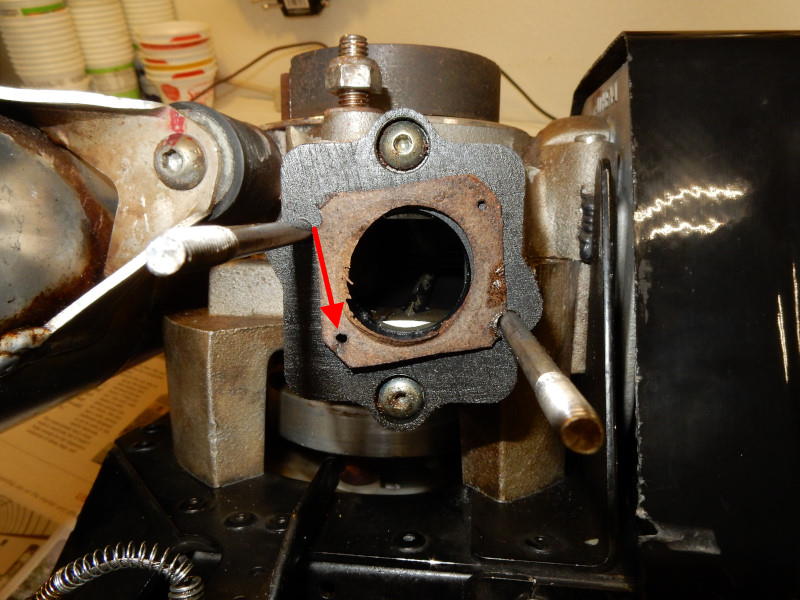
It is important to note that there are other things that can also cause fuel starvation. The pump cannot work unless the strong pressure impulses that exist in the crankcase get adequately transmitted to the pump. Such things as sealant in the reed valve body passageway, a defective or incorrectly oriented gasket, or a leak can prevent the pulses from reaching the pump. There have been defective carburetor/reed valve body gaskets that have the hole for the pump port either misaligned or too small to adequately transmit the pulses needed at the pump.
The carb-to-reed valve gasket in the photo below was so misaligned that it completely covered the pulse port on the reed valve body. The actual port is just below the hole in the gasket (red arrow). There is enough vacuum in the carburetor jet circuits to suck some fuel from the tank but not enough to run the engine off idle. Typically, the carburetor will have enough fuel in it to run at wide open throttle for a second or less. If the pilot immediately goes back to idle, the carburetor may supply just enough fuel to run.
What causes premature failure of reed valves?
Reed valve petals vary in quality. The best petals are made of carbon fiber material which is lightweight, very strong, and the petals should last for hundreds of engine hours.
Most pilots do not understand the abuse petals undergo during operation. The open and close thousands of times per minute. When the engine is operating normally, the pressures in the crankcase varies from < 1 PSI (0.07 BAR) at idle to a few PSI (0.25 BAR) at full throttle.
If the exhaust system becomes restricted or clogged, the pressure inside the crankcase rises dramatically. Not only does this lower peak engine output but it also puts a severe strain on the reed valve petals as they slam shut. Not only this, the excessive pressure in the crankcase affects the internal pump assembly in the carburetor in the same way. In particular, the pulse port side of the pump diaphragm will become deformed and the pump will not be able to do its job.
If you are having problems at WOT, checking that the exhaust system is functioning correctly must be done. It was to check. Take off the muffler assembly and shake it. If you can hear things banging around inside the muffler that is your cue to take it apart and examine the insides.
B. Reed valve body leaks
A leaky reed valve body (not leaky petals) can lean out the fuel mixture, may cause overheating, poor or no idle, or may result in stall at full throttle. It is a particularly bad problem for paramotors that have an internal pulse port because a leak will affect the internal fuel pump in the carburetor.
Most paramotors have an external pulse port with a small piece of tubing a.k.a. "pulse port line" between a fitting mounted directly on the crankcase and the fuel pump on the carburetor. These engines will not experience fuel pump failure if the reed valve body leaks. However, they can experience other fuel starvation issues.
See C.1 below in order to perform a simple leak test.
C. Test, examination, and reinstallation
The reed valve in the photos below is from a Top 80. Other paramotors may be a little different. Always check the instruction manual for your engine before and during assembly, if possible. Generally, reed valve petals should be replaced every 200-300 hours or whatever the owner's manual suggests. If they are not replaced and fail at some point, the petal pieces could damage the cylinder and piston but it would likely be minor. A failure of the reed valve will shut the engine down – which could be inconvenient. The life of the petals
1. Perform a leak test – Use a gas leak detection fluid or a soap suds solution and apply it around the area where the valve contacts the engine crankcase. Pressurize the crankcase and the look for bubbles.
Here is a video of leaking reed valve body. Even though the screws which fastened the valve body to the engine had been tightened correctly, the valve body face and the crankcase face were not quite flat. The variation was greater than a dry gasket could seal. The fix for this: apply RTV to both sides of the gasket. There may also be manufacturing or installation defects which will have to be repaired.
2. Remove the reed valve for examination – The carburetor will have to be removed n order to access the two reed valve screws (other reed valve bodies may have 4 screws). Remove the screws and pull out the reed valve body. Be careful not to tear up the gasket. If you do it correctly, you can reuse the gasket between the reed valve body and the crankcase.
3. Engines with an internal pulse port Check the small port that goes from the crankcase side of the reed valve to where the carburetor mounts. It must be free of any obstructions, such as sealant. I recommend that pilots carefully increase the port size to 3.5mm, including the hole in the gasket, using a #27 (3.5mm) bit if it has not already been done. This will increase the passageway's area by about 25% and help improve fuel pump performance. It is also possible that in certain conditions an even greater diameter port will help. This would include the presence of high viscosity oils and/or cold operating temperatures. Vittorazi specifically recommends that the internal pulse port passageways in the carburetor be reamed oversize.
4. Carefully examine the reed valve. If the petals are missing, curved away from the valve body, cracked, chipped, or deformed, they must be replaced. An easy way to see if the petals are closing symmetrically is to put a small led flashlight into the valve body and look around the outside edges of the valve body for light leaking out. Do this in a dark room, of course. The light seen, if any, should be uniform around the part of the reed that opens. There should be no gaps. The reed cage may not be perfectly flat which will cause a small gap (<0.5mm) between the reed petal and the cage that is not uniform around the edge of the petal. This is not a cause of great concern.
One of the petals on this reed valve had cracked. The pilot was experiencing fuel starvation and figured it was the carburetor but it was not. He did his homework on checking everything on his engine (a Top 80) and discovered the real problem. The engine would run but poorly.
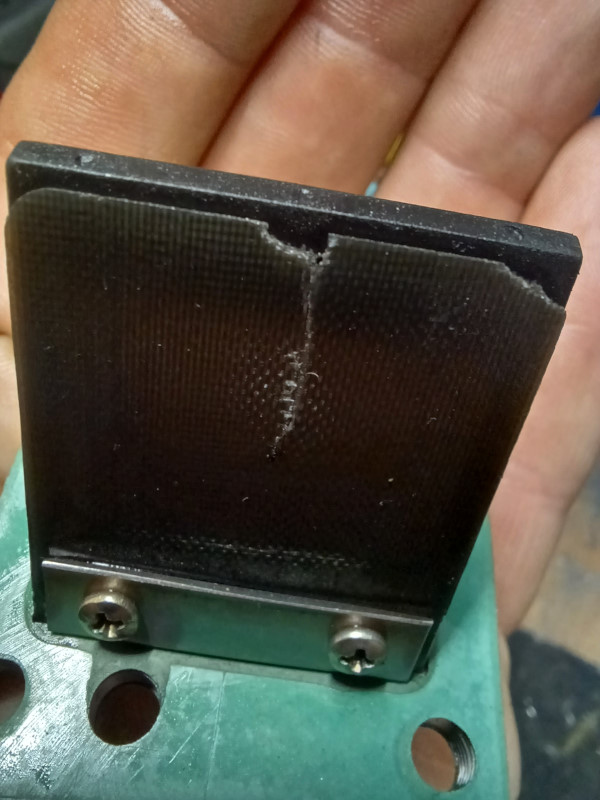
photo courtesy of Tom Galis
Below, this reed valve from a Polini Thor 130 had one of its four petals missing (broken off). The broken petal went through the engine, probably doing some minor damage to the piston and cylinder at the intake port.
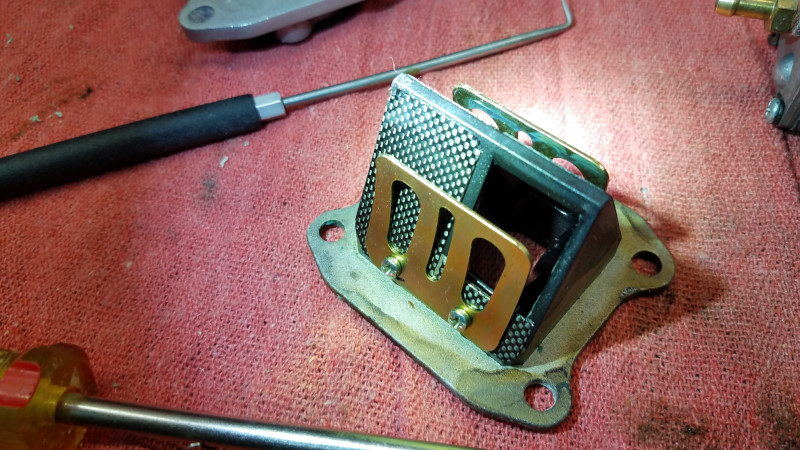
photo courtesy of Tom Bird
5. Check the closing force of each petal (optional). However, if you just replace the petals, you will know that the closing force is correct and any more testing is unnecessary.
If the petals have a weak closing force, they will not act efficiently and not close quickly. This will allow the fuel/air mixture to come back into the carburetor rather than stay in the crankcase a.k.a. "spitting".
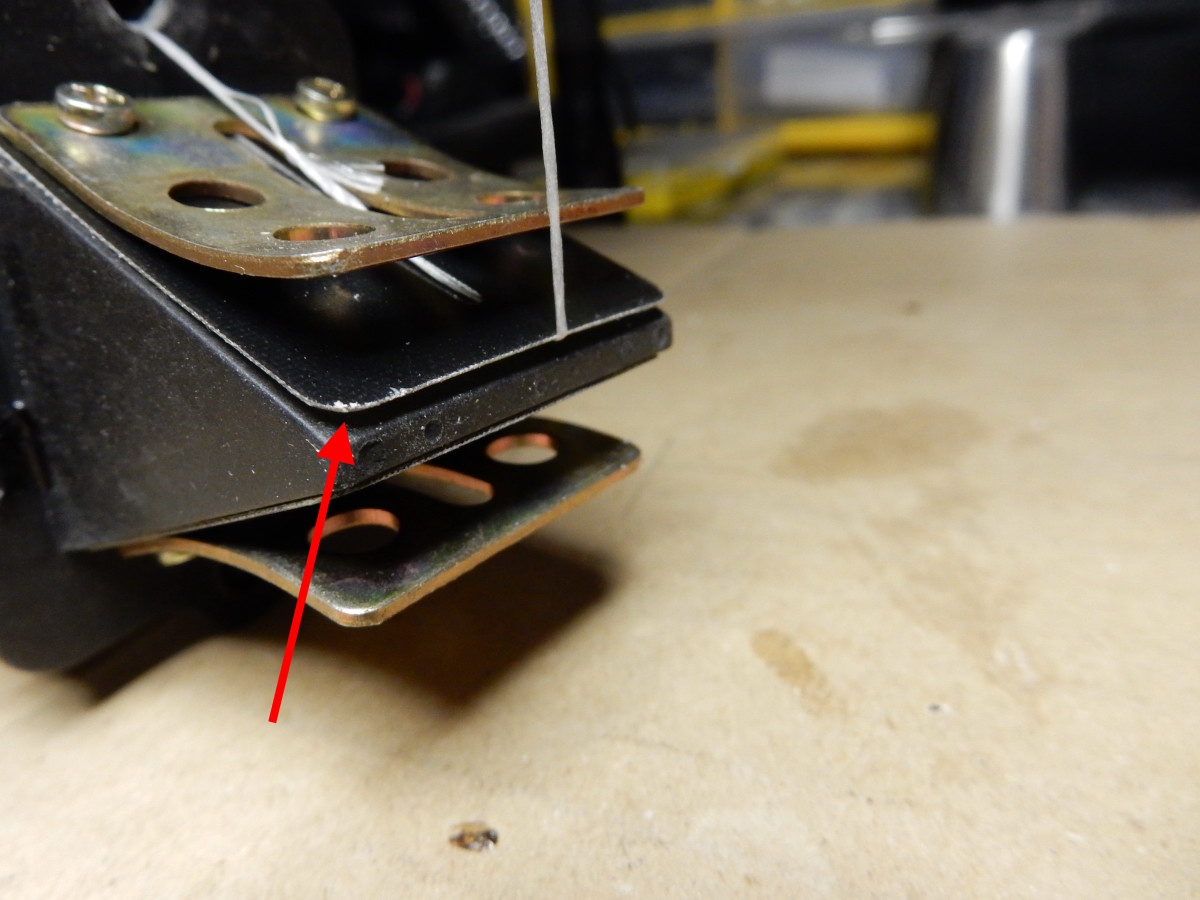
To check the closing force, you will need a letter scale that can be held in the hand and some dental floss. Carefully lift a petal with a toothpick and thread a piece of floss under the lip of the petal, through the center slot, through the bolt hole, and tie it around the long carburetor bolt. Make a loop in the other end of the floss. Using the scale, measure the force needed to lift the reed petals 2mm (see arrow on 2nd photo). The value should be about 2.5 oz. (71 gr) or more. If it is less than 2 oz. (57 gr) I would replace the petals. Be sure to check both petals of the reed valve.
Even if the petals opening force is correct, the petals may still have to be replaced if they are more than a few years old. New petals are a good investment that will keep your paramotor running well. Miniplane-USA stocks the correct petals for a variety of engines.
Polini petals and parts are available from Polini Parts
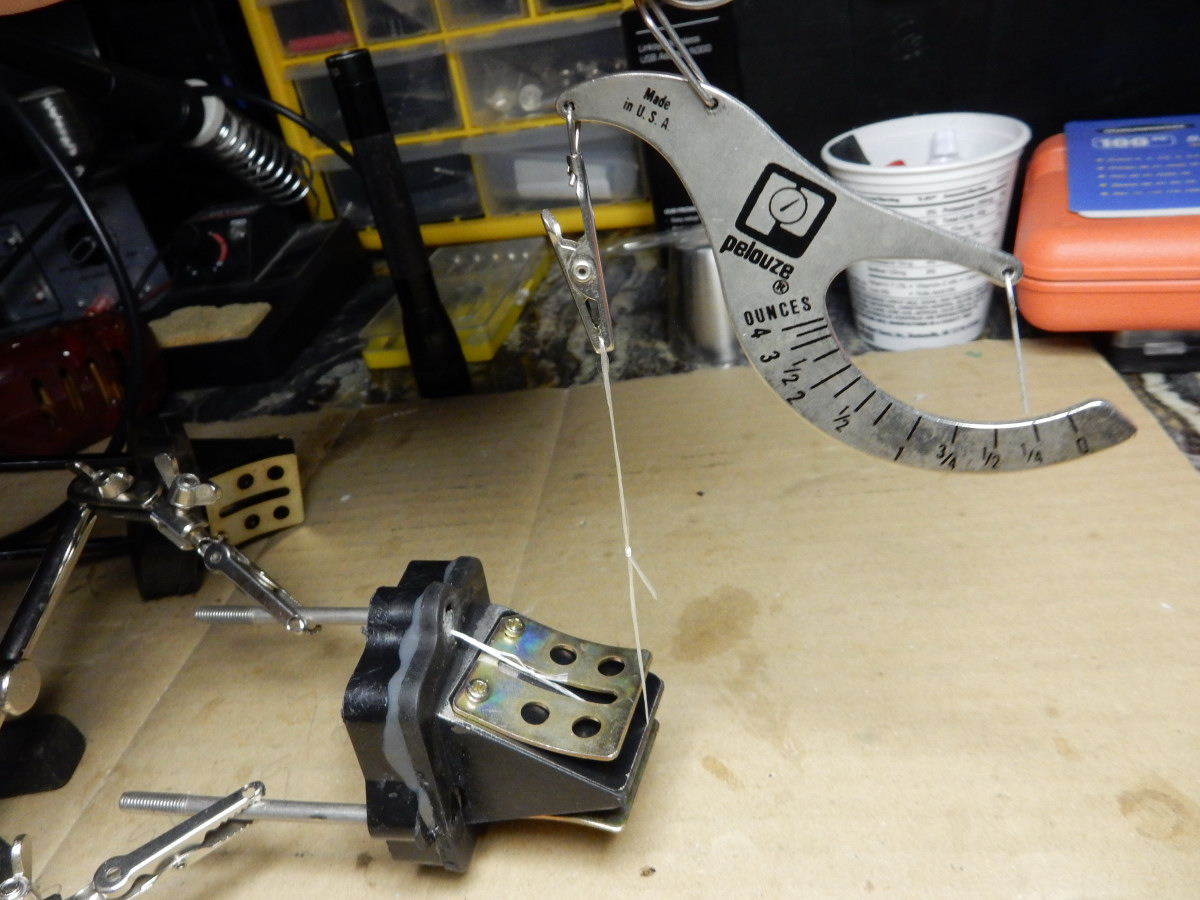
The red arrow points to the measurable gap between the reed petal and the valve body. The curved steel plates prevent the petals from opening too far.
When replacing the petals use blue threadlock on the screws. Be sure that the new petals fully seal and are as flat as possible. There is some play in the exact position of the petals which is why you may need to move them around a bit to get them as flat as possible. If the petals will not seal the opening, you may need to replace the entire reed valve.
6. Reattach the reed valve to the crankcase. Clean the threaded holes in the crankcase and the reed valve body screws with brake cleaner and blow dry. Apply blue threadlock to the screws and torque to the correct specification for your engine (Top 80 should 2.5 Nm/22 in lb., others similar).
7. Reattach the carburetor, etc.
![]()

