


Polini Flash starter problems
by Had Robinson
updated August 13, 2021
NEVER PULL THE STARTER WHILE THE ENGINE IS RUNNING – IT WILL CHEW UP THE PAWLS!
A. Replace it with a Briggs & Stratton starter B. Starting w/o the flash C. Maintaining the OEM starter D. Fixing the OEM starter E. Lower the compression
Discussion of this engineering disaster
Note: I am finishing the testing on a compression release valve (CRV) for paramotors. It eliminates the need for a flash mechanism and greatly relieves the stress on the starters, especially electric starters. The cost of this new feature will be about $150, largely due to the necessity of machining a 10mm port in the head of the engine.
Note: It is a good idea to lower the compression just a little if peak output is not needed.
For some years now many lovers of the Polini engines (the quietest and smoothest engine out there) have worked together to modify the poorly made and designed Thor starter. Sadly, it has all been for mostly nothing until recently.
We finally have a permanent solution that is available on eBay for around $17 (2021) with free shipping.
It has been a long journey. First, we worked on stopping the flash from binding and jumping out of its seat. Polini took note and finally fixed this. We also tried machining an insert that eliminated the flash entirely. Unfortunately, the vibrations of the engine caused everything to wear against the soft aluminum insert. We put steel roll pins in the insert in order to hold the pawls. Just the same, the pawls would still wear out quickly, including the pawl holder. It was hopeless. It is impossible to eliminate the severe vibration that is present in paramotors that is a common cause of the part failure.
One of the most frustrating results of a failure is the sudden unwinding of the starter cord at anytime regardless of how much attention and care a pilot takes of the starter. (Anyone remember the Alfa Romeo?) The pull handle and cord would inevitably go right into the propeller and yank the guts out of the starter and, sometimes, damage the propeller. If the pull handle did not go into the prop, the cord would wind up in the flywheel and the whole thing would self-destruct. This is the most serious flaw in the starter and is caused by the pawl holder setup engineered by Polini.
If the pawl holder rotates (due to the intense vibrations of the engine) in a clockwise direction (when facing the front), the pawls will extend and start to catch the bite plate on the flywheel. Next, the starter pulley will rotate, overcoming the spring in the pulley. Then the cord will come out of the starter and... you can guess the rest. This design flaw often causes a lot of expensive peripheral damage to say nothing of the fact that the pilot can no longer start his engine.
The solution below puts to rest the Flash starter nightmare. However, there is a slight drawback – it requires a bit more strength in order to start the Thor engine because there is no longer a Flash spring. In addition, the decompression port on Thor engines takes on a whole lot more importance because the pilot will directly feel any increase in the engine compression when starting. However, I have installed a Husqvarna chainsaw CRV on our test engine which completely eliminates the need for the Flash spring.
A. Replace the OEM with a Briggs & Stratton starter – no flash, low cost
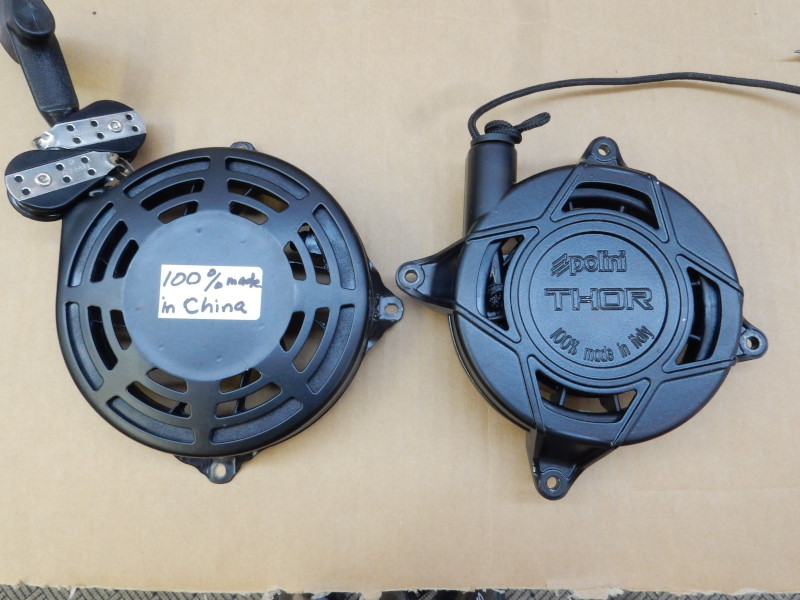
For years I have been hunting on the Internet for anything that might replace the expensive, poorly made Polini starter mess. Looking at dozens of starters for small engines, one recently caught my eye: Chinese made clones on eBay of the Briggs & Stratton starter used on riding lawn mowers. (The starter does not include the pulleys in the photo above.) The Thor starter is a COPY of the Briggs & Stratton starter. The only difference is that the Thor starter is a flash type = guaranteed to fail after a short period.
A good knockoff sold on eBay is the Raisman #80-41-680. The B&S starter was copied by Polini, a flash spring and the final cost is over $220 for something that is inferior to the B&S. The clone costs a fraction and will last 100+ hours. A bonus is that the B&S starter (and clones) has a 25% larger pulley which means more leverage when cranking the engine. This is particularly advantageous for use on the high-compression Thor engines.
In doing some research on the Thor OEM starter, I discovered that paulg18 of the UK Paramotor Club posted (October 14, 2017) his discovery that the B&S starter could be switched out with the Thor OEM starter. I could have saved myself a lot of trouble if I had done some checking on the blogs first. Thank you and kudos to paulg18 for discovering this first.
To sum up, Polini copied the B&S starter and then manufactured a more poorly made one that costs about 13X as much. The Chinese clone starter I installed on our Thor 130 has lasted over 100 hours and is still in good condition. When it fails, I will throw it out and install a spare I keep around.
Why waste time rebuilding the Polini starter? Buying the rebuild kit + postage for the OEM is nearly the same price as a complete new clone without any of the work (taking the entire starter apart, cleaning it, putting it back together, etc.)
The clone starter requires *no* maintenance. It is a throw-away starter!
Replacement details
Parts needed:
- (1) B&S starter or a Chinese clone
- (1) 5mm x 90mm replacement mounting screw, washer, and locknut
- (4) 3.2mm shims made from commonly available washers or small nuts (see below for details)
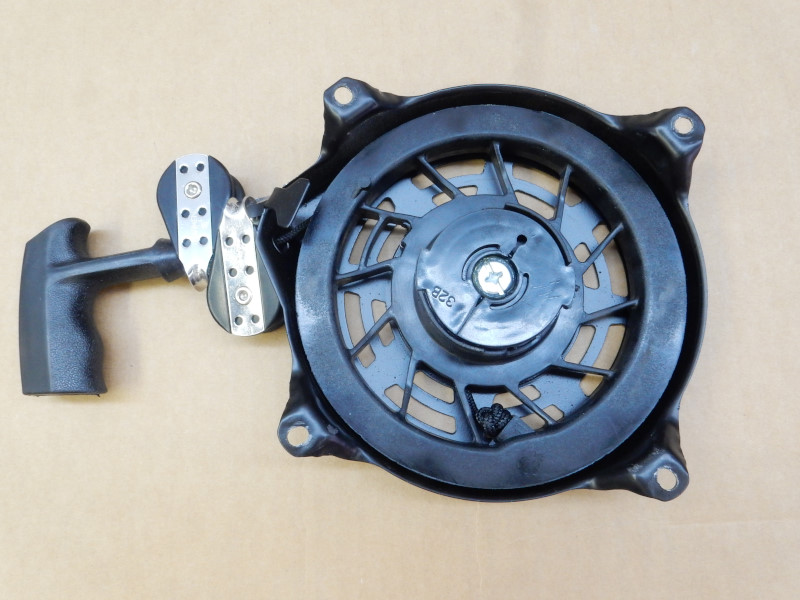
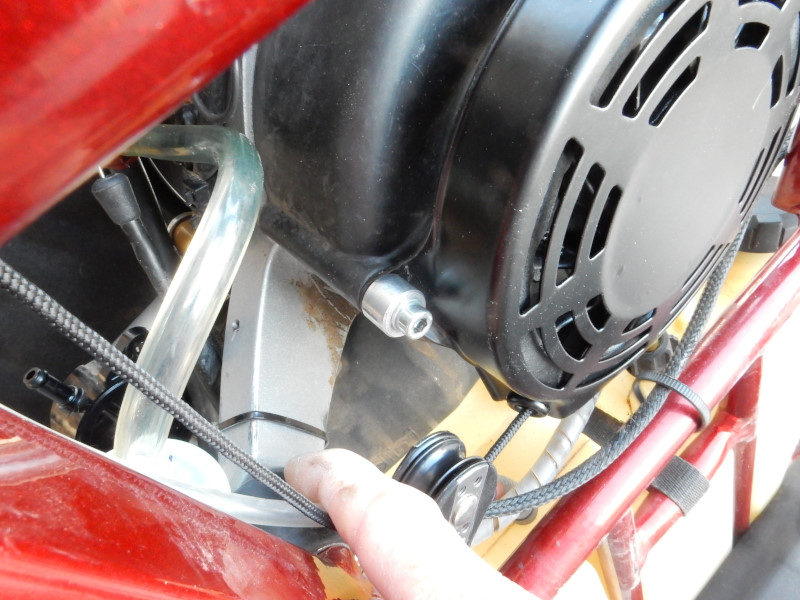
1. Modify the mounting holes The (4) mounting holes of the Chinese clones do not line up precisely with the holes on the engine. This can be fixed by either bending the tabs slightly or by using a reamer or a round file to slightly enlarge the holes. Note: The starter cord pulleys in the photo below are the premium marine Harken pulleys which will last indefinitely unlike the cheap OEM Viadana pulleys.
2. Extend the bite-ring The pawls of the clone just engage the bite-ring. Leaving things "as is" would probably work for a while but the starting forces would be put right on the edges of the pawls which might tend to a fracture of the ends. To be safe, the bite-ring attached to the flywheel needs to be raised about 3.2mm with (4) shims. This dimension is the approximate thickness of (3) 5mm washers or a reamed/drilled-out 10-32 nut (or equivalent). Use a reamer or a 13/64"/5mm bit to remove the threads on the nut. The shims must be placed between the bite-ring and the threaded holes on the ends of the special screws that attach the cooling fan to the flywheel. However, the addition of the shims requires a longer screw for securely attaching the bite-ring to the flywheel. The OEM 5mm x 12mm flat-head socket screw should be replaced by a 5mm x 16mm. The OEM screws do not have enough thread to keep them secure.
3. Replace the bottom mounting screw There are (4) starter mounting screws (not shown) – (3) 5mm x 80mm and (1) 5mm x 25mm. However, the bottom 80mm screw must be replaced with a 90mm screw, washer, and locknut. This is because the threaded hole for this screw is too shallow and flimsy to withstand the starter forces for any length of time whether a clone or OEM starter is used. The 90mm screw will extend beyond the existing threaded hole so a washer and locknut should be installed to strengthen the screw's anchor. Experience has demonstrated that the threads in the soft aluminum crankcase will eventually strip from vibration and why the locknut must be used.
A failed lower mounting screw
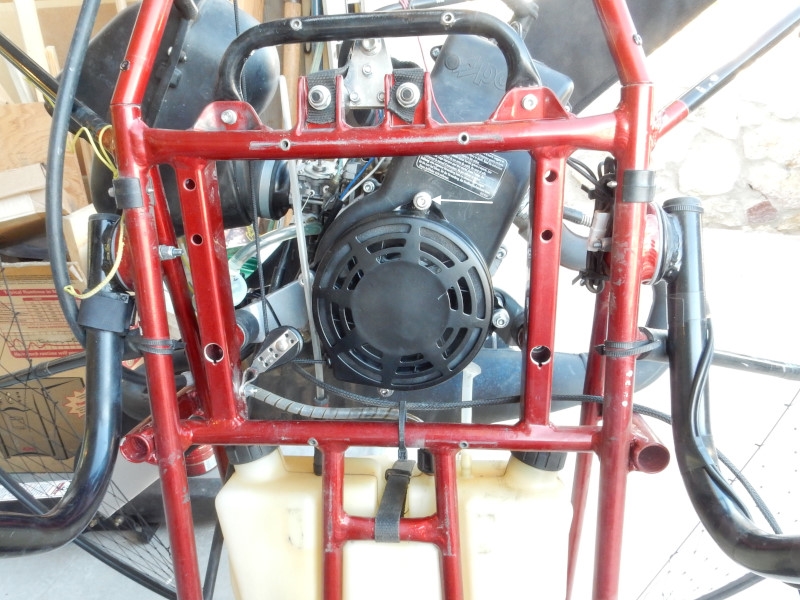
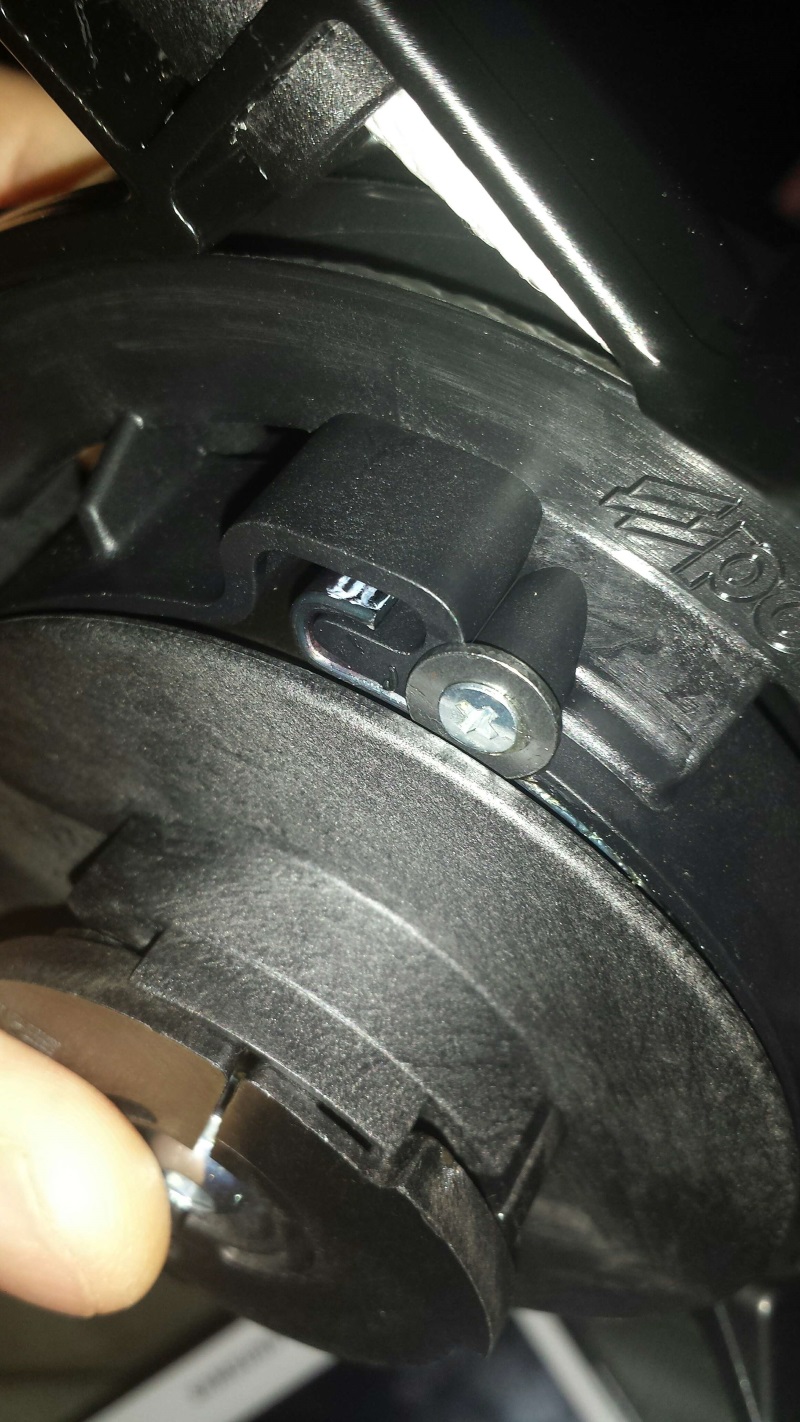
4. Use the existing aluminum spacers The OEM starter had to be raised away from the engine due to the extra depth required by the flash spring. This meant that the mounting screws were all too long for the clone B&S starter. This is easily fixed by using the aluminum spacers that came with the OEM starter as giant washers under the heads of the OEM screws. Tightening everything up, the starter engaged the bite-ring just fine.
The photographs of the installed starter show how the OEM spacers are used. The white arrow points to one of the (4) aluminum spacers that originally was between the starter and the cooling shroud but which is now directly under the now longer mounting screw.
This starter works perfectly. It is truly a "throw-away" starter should anything wear out.
In tests, the clone starter lasted over (60) hours so far with no signs of wear.
When a starter begins to fail, the pilot will notice that the starter cord does not retract as quickly or easily. When pulling the starter cord, he can also hear a whirring sound coming from the starter which was not there earlier. What usually happens is that the spot welds that hold the starter together start to fail and the pulley begins to rub on other parts, hindering it from rewinding. THIS IS YOUR CUE TO REPLACE THE STARTER ASAP.
In general, if you notice any changes in how the starter is working, change it out. I always have a spare starter around that can be installed in less than 15 minutes.
B. Starting the engine with a non-flash starter
Proper priming is very important to ensure that the engine starts the first time it is pulled.
IF THE DECOMPRESSION PORT IS THE SLIGHTEST BIT CLOGGED WITH COMBUSTION RESIDUE, A NON-FLASH STARTER WILL BE MORE DIFFICULT TO USE.
Unless you are an orangutan or a chimpanzee, it is much easier to start the paramotor on your back – to say nothing of the fact that it is safer!
If you cannot pull the engine over slowly by hand, the port is probably clogged. Remember that the faster you pull the starter, the more compression you will feel and harder it is.
To start the Thor, pull through at least (2) compression strokes very slowly to charge the crankcase with fuel/air. Then, pull through (2) compression strokes relatively slowly i.e. "one thousand, 2". The secret is steady, firm pulling of the starter. Do not attempt to pull too fast. Starting without the flash mechanism requires a learned technique that requires practice.
C. Maintaining the OEM Thor starter
Note: Unless you like to be endlessly frustrated, replace this OEM engineering disaster with a clone starter.
Disassembly
- Use nitrile gloves with heavy work gloves. Working with springs can be dangerous. Wear eye protection. It will greatly help if you take your own photos or videos when
disassembling the starter. Especially note the orientation of the rewind spring and the direction that the cord is wound around the pulley.
- Remove starter from engine – The best way to do this is to disconnect the lower parts of the harness from the engine frame and then flip up the harness and hold it with some cord against
the front of the upper cage. Remove the (6) 5mm screws that hold the back-plate to the frame. You now have complete access to the starter. Remove the (4) screws that hold the
starter to the engine. If you have the special lower screw that has a nut on it, it is much easier to gain access to the rear of the engine if you drop the fuel tank six inches.
- Disconnect the lower and upper starter pulleys and pull the starter out. See the photo in section A below for the names of the parts of the starter.
- Relieve the tension on the rewind spring. You can disconnect the starter handle and let the cord be slowly pulled back into the starter, holding the pulley at all times until the
tension is relieved. Better is to pull the starter cord out about a foot and then a bit more until the notch in the pulley is just where the cord exits the starter. Hold the pulley from turning. Pull
the cord back into the starter so there is a loop between the where the cord exits and the pulley. Put the cord in the notch and gently let the pulley completely rewind with the cord in the notch. Be sure to hold the pulley with a rag or your thumb so that
it turns slowly. It is under tension. This way, the cord is not retracted but the pulley turns and the
spring tension is relieved. The cord and handle can remain attached to the pulley.
- Remove the center starter bolt. For flash starters the pawl holder and pulley are two separate parts. On non-flash starter, the pawl holder and pulley are a single piece. Pull the pawl cover up and out. Remove the two pawls and two springs.
- Carefully pull up the pulley from the starter housing while turning it a bit back and forth. The pulley with the spring inside should free itself from the center post. You do not want the spring to
pop out! The rewind spring may go everywhere unless you are careful!
- Thoroughly clean the rewind spring with a rag and mineral spirits to get every trace of grease off of it.
- Leave the Flash spring in the pulley (if you have the flash starter). If necessary, it can be removed but it is under great tension (see the next section). I recommend leaving it in the pulley unless you have had experience working
with very powerful springs. Clean the Flash spring as best as you can. A brush, mineral spirits, and air work the best. Get as much of the grease out of it as possible.
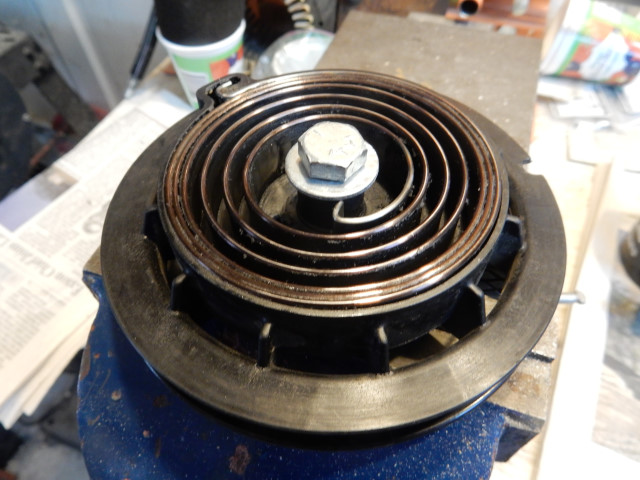
- If the Flash spring must be removed, secure it to a solid surface, as here. A bolt put through the pulley and held in a vise will hold it while working on the spring. Failure to do this can
result in serious injury if something gets loose. Use needle-nosed Vice-Grips to grab the inner
tip of the spring and carefully pull up on the spring. It will come up and unwind. Do this slowly. BE CAREFUL! WEAR EYE PROTECTION! WEAR HEAVY GLOVES!
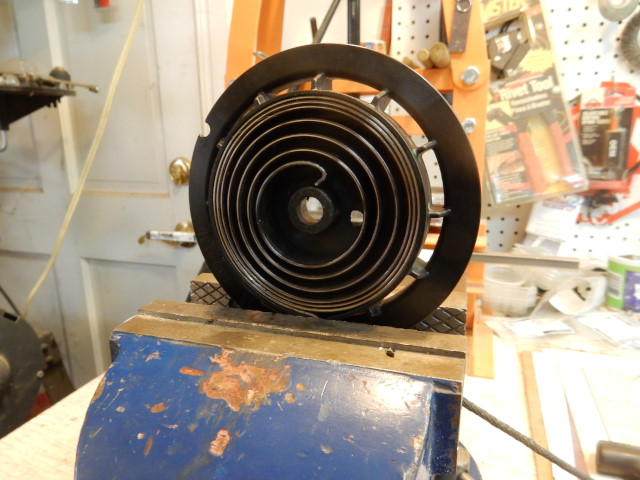
Here is another way to safely hold the flash spring in the pulley while installing or removing it. If the outer end of the spring is firmly in the jaws of a vise, it won't go anywhere. Thanks to Tom Bird for this tip.
- Clean everything with mineral spirits.
Assembly
- Look carefully at part #3a in the photo below in order to get the spring oriented correctly. The spring can go in the pulley either way but only one way works. Start with the outside end of the spring and work the spring into the pulley. The spring
must be held at its outside circumference in order to keep it from popping out.
If the flash spring needs to be installed, put the pulley in the vise (as in the photos above) and start with the outside of the spring in the notch in the pulley. Use the needle-nosed Vice-Grips to wind the spring enough to get in the pulley. This is a difficult job and requires strength, patience, and care. - After the springs are installed, use fine machine oil (e.g. air tool oil) to lubricate them. MORE LUBRICANT IS NOT BETTER. Do not use grease except for a small amount around the
surface of the shaft in the starter housing and on the inside of the bushing of the pulley. Grease just attracts dirt.
- The threaded hole in the center of the starter housing center post must have all traces of oil and grease removed. Use brake cleaner and air to do this and to clean the bolt, as
well. The bolt must be installed with blue threadlock. If there is any trace of lubricant left on it or in the hole, the threadlock will not hold. If the bolt gets loose
while flying, the guts of the starter wind up in the flywheel and self-destructs along with some other parts on the engine.
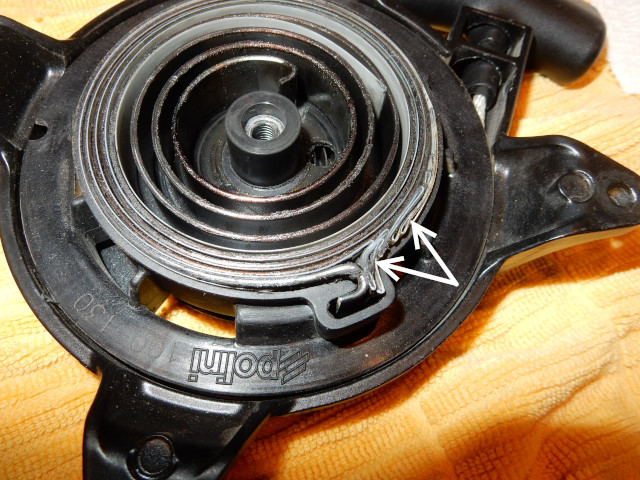
- There is a small observation hole near the center of the pulley which is used to make sure the hook on the inner end of the rewind spring is properly installed in the slot adjacent to the inner shaft.
The slot can be seen just to the right of the starter shaft in part #1 in the photo below.
- Wrap all but the last foot (30cm) of the cord in a clockwise direction around the pulley when the rewind spring side of the pulley is facing up. The free end of the cord should be
about the distance from the cord exit hole in the pulley to the top pulley (where the starter handle is). If the OEM replacement cord is not available, the new cord should be 5mm Dyneema
approximately 66" (168cm) long.
- Put the pulley on the center shaft, making sure no grease gets in or on the threaded hole in the shaft. A cotton swab can be used to clean any grease away from the threaded
hole. Once the pulley is fully pushed down into place, it can be turned in a counterclockwise direction and the hook in the end of the spring guided into the slot adjacent to the shaft. A
small screwdriver can be used through the hole to push the hook into the slot, if necessary.
- Install the springs, the pawls, and the pawl cover in the pawl holder. Turn the pawl cover as you push it down so that the pawls are correctly engaged in the slots of the pawl cover.
You can check things by turning the pulley in a counterclockwise direction to see if the pawls will push out to engage the starter ring on the flywheel. DO NOT LUBRICATE THESE PARTS!
THERE MUST BE ENOUGH FRICTION TO KEEP THE PAWLS FROM EXTENDING DUE TO ENGINE VIBRATION!
- Apply blue threadlock to the center bolt and install it. Tighten to 10 Nm.
Failure to use threadlock on the center bolt will result in the bolt loosening, falling out, and the starter guts will go into the fan and bite plate and all or most parts will self destruct!
Check again to be sure the pawls push out when the pulley is turned counter clockwise and retract when the pulley is turned clockwise. The pawl cover should not turn easily – which is the purpose of the circlip around its split shaft.
Cord length for the Polini starter: 1.8m (6') - Tension up the rewind spring counterclockwise in the same manner as the tension was relieved. The notch on the pulley allows the pulley to be turned (and the spring tensioned) without unwinding the cord.
Turn the pulley (3) complete revolutions with the cord in the notch. There must be enough tension to prevent the starter handle from loosing enough to go back into the propeller. One pilot has suggested that the starter pull handle be fastened with Velcro to the frame after
starting so this cannot happen.
- Reinstall the starter on the engine. All the screws should be torqued to 4-5 Nm except the top screw which should be just snug. Threadlock is not necessary on any of the
screws. DO
NOT USE THREADLOCK ON THE SCREWS HOLDING THE BACKPLATE TO THE ENGINE FRAME! If you do, you may not be able to get the screws out of the screw holder that snaps into the frame.
- Just remember that no matter what you do, parts of the starter will wear out fairly quickly. Read the details on this below. The OEM starters on these engines are FRAGILE so be gentle if you decide to keep them.
D. Fixing the OEM starter
1. The Flash mechanism
The Flash starter on the Thor 130 and other models has various problems and a short life because of design and material issues. Rather than have a durable starter with few moving parts (e.g. Top 80, Simonini) Polini cloned the Briggs & Stratton starter. However, because of poor construction, the Polini starter fails after a few dozen hours of engine operation. It has little to do with whether the starter is even used. The intent was to reduce the effort necessary to start the engine. In this regard, the flash mechanism is a success. In fact, the flash reduces wear and tear on both the pilot and the starter mechanism.
The Flash starter
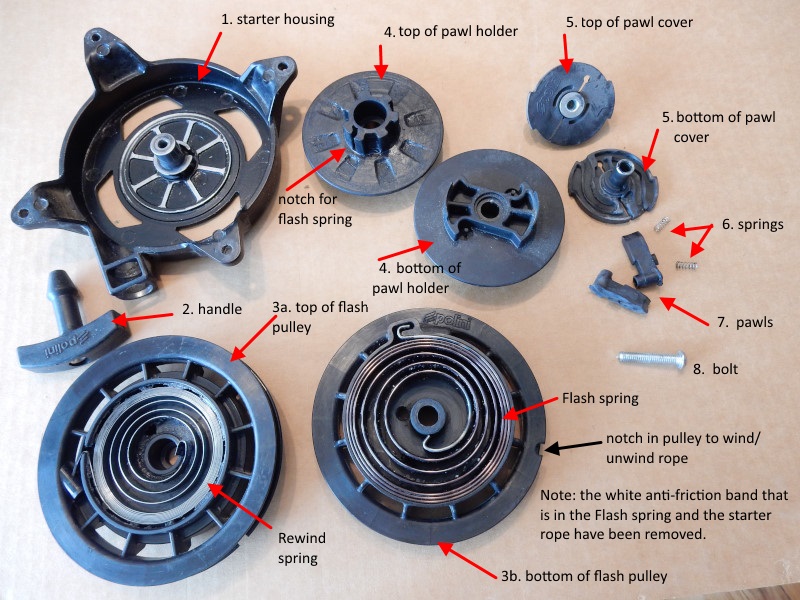
Starter mounting screws (not shown) – (3) 5mm x 80mm and (1) 5mm x 25mm. However, the bottom 80mm screw should be replaced with a 90mm screws and locknut.
The failure of the Flash (including the standard) starter is primarily due to the extreme vibration that is created in lightweight 2 stroke engines. Anything that can bend or move against some other surface will quickly wear or shake apart – unless it is protected in some way.
Why are starters on some other paramotors much more reliable and durable? It is because moving parts in the starter are attached to the flywheel so that they cannot move once the engine is running. The extreme centrifugal forces of the rotating flywheel prevents the starter parts mounted to the flywheel from moving, rubbing, and wearing out. The Miniplane Top 80 is an example of this design which lasts the life of the engine. The Top 80 starter housing and pulley that are attached to the engine housing has only one moving part (other than the spring which rarely wears out).
The Flash starter has three serious issues:
- Rapid wear of the pawl holder [#4], the pawls [#7], and the pawl cover [#5]. The standard starter also experiences rapid wear of the pawl holder and its associated parts.
- Bunching up of the white anti-friction band that helps the Flash spring move smoothly.
- Movement of the Flash spring away from and out of the Flash pulley (As of February 2017, Polini has fixed this problem in new starters.)
The moment the engine is running, the starter begins to fail:
- The Flash spring begins its movement out of the Flash pulley towards the pawl holder. This has been fixed on some of the newer models.
- The white tape bunches up and begins to interfere with the operation of the Flash spring as well as helping it to push up on the pawl holder. Newer versions do not have the tape.
- As the pawl holder is forced against the pawl cover, the pawls jam and are prevented from engaging the starter ring on the flywheel. This is largely cured on the newer models, thankfully.
- As the engine continues to run, the pawl holder wears badly where the pawls contact it, the pins break off, and pawls fail, and the pawl cover looses all of its grooves and ridges that direct the pawls. It appears that newer versions of these parts are better hardened and have less tendency to wear out so quickly. But they still wear out!
After more engine time, the pawls will become free of the holder and cover. They then get sucked into the cooling fan, wrecking everything. I launched one time and a minute later I heard this awful noise. I landed immediately and saw what had happened. It was a mess that kept me on the ground for days. Even though the newer versions of the flash are less flimsy, pilots must keep their eyes on things, just the same.
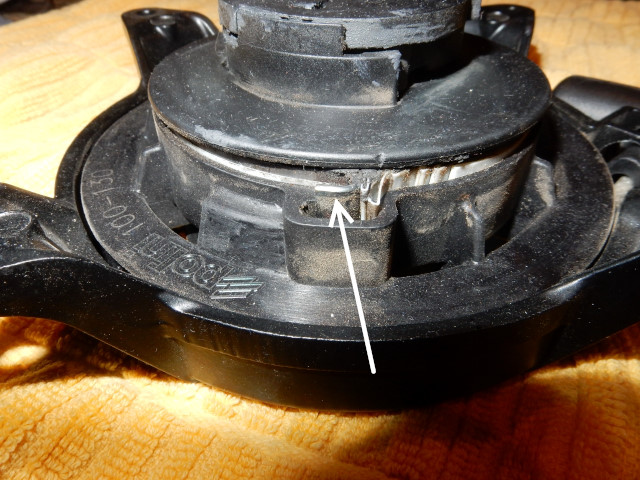
The Flash starter (original, old style) in the photo below has less than 10 hours of engine time. The end hook on the Flash spring has already begun moving out of the Flash pulley – jamming the pawl holder into the cover. The white anti-friction band that is in the flash spring is bunching up and out. It, too, will eventually jam up against the pawl holder forcing it into the pawl cover.
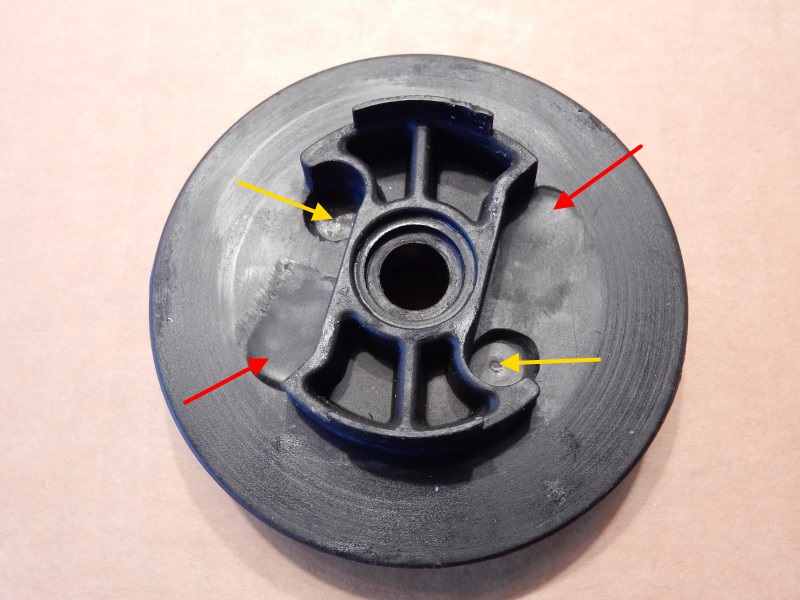
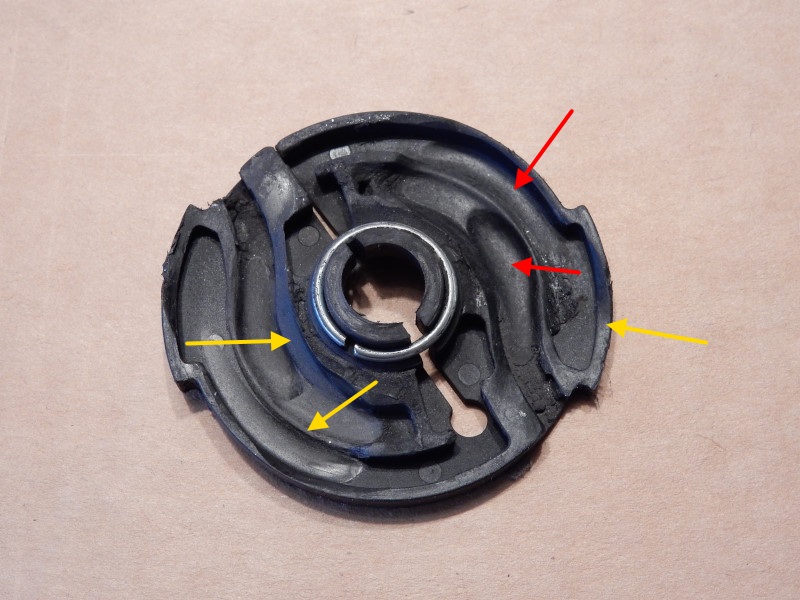
Below, wear points on the pawl holder from the vibration of the pawls while the engine is running. The pawls have started to wear into the holder (red arrows). The yellow arrows point to the pins, now broken off, that held the pawls in place. The plastic Polini uses is so cheap.
Below, the red arrows point to deep grooves cut in the pawl cover by the vibrating pawls. The presence of much grease only slightly slowed down the damage. The yellow arrows point to worn down rims of the pawl cover that aligns the pawls correctly. As a result, the pawls would not engage the starter ring on the flywheel and the unfortunate pilot could not start the engine. He had to pack up and go home.
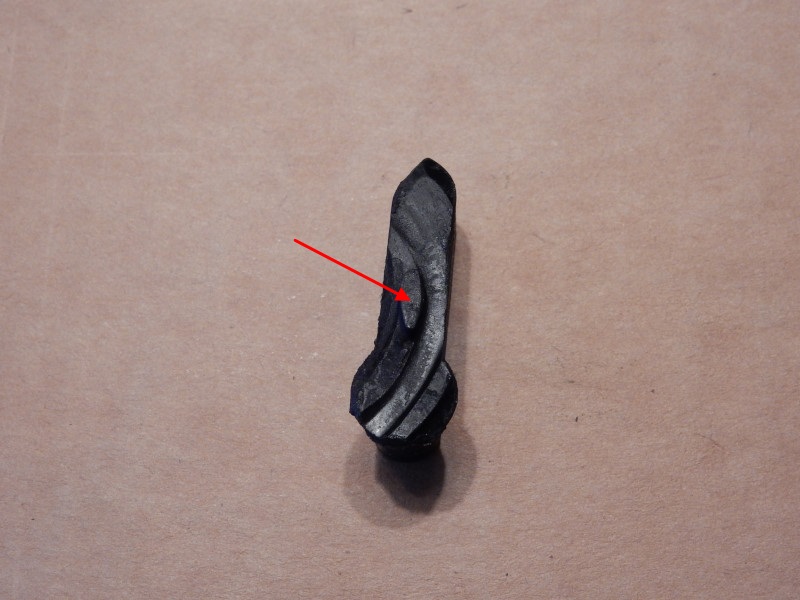
The tang that advances the pawls into the starter ring when the starter is first pulled has been worn away. When these tangs wear away, the pawls will not be retracted when the starter rope is released. They will then hit the starter ring and the tips will grind away, quickly making the starter useless.
Flash starter modification
Note: If you have the newer versions of the flash system, these modifications have already been done at the factory. The pulley and the flash spring are joined together so that the spring does not work its way out and jamming the starter pulley. Here are the steps:
- Remove the white tape from the Flash starter. Grab it with some pliers and just yank it all out. The Flash, however, will require more maintenance i.e. fine machine oil to keep things slippery. The white tape will no longer be there to work its way out and jam things.
- Drill and tap for a 3mm (4-40) screw in the hook at the end of the spring and the pulley housing. Alternately (but not as durable), you can use a #4 or #6 sheet metal screw. However, you must still drill the correct sized hole but will not need to tap it. The screw will keep the spring from moving out of the pulley. The hole must extend through both sides of the cavity which surrounds the hook. You do not need to drill through the spring a second time (the back side of the hook on the spring). The threaded hole must be thoroughly cleaned with brake cleaner and air so that the threadlock will hold.
- Put blue threadlock on the screw so it will not work its way out of the housing.
Here is the modified Flash pulley and Flash spring with the screw holding everything tight.
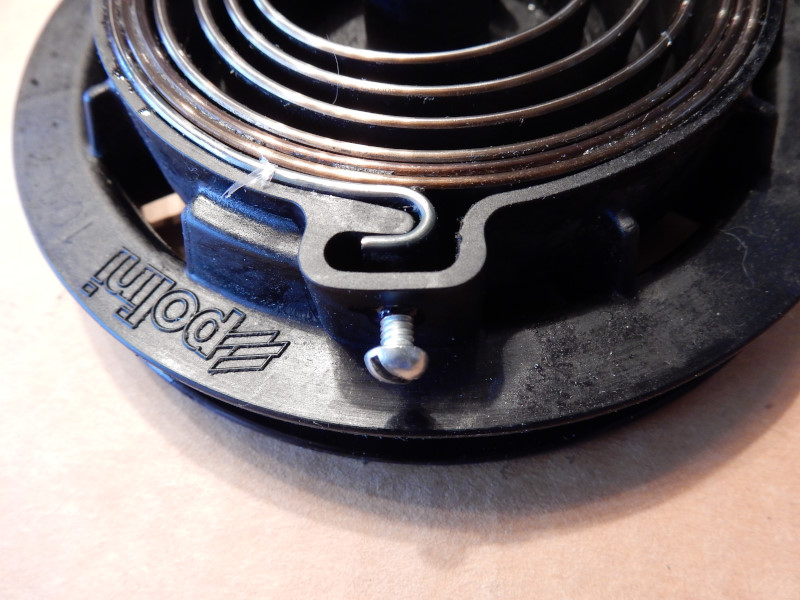
Pilot Larry Koral sent me these photos of some new Flash starters from Polini with the flash spring secured (as of January 31, 2017). They added a small raised plastic extension for a screw and washer. However, I do not think such a small screw can successfully resist the lateral pressure from the spring. Our fix for this would require the screw to be sheared off – something that would not happen. Everything in the starter is subject to extreme vibration. Will it hold fast? Pilots can always do the modification detailed on this page if this fix from Polini fails.
As of 2018, Polini has added a second screw to hold the flash spring in place.
Premature wear of the pawls, the pawl holder, and cover
There is no solution to prevent these parts from quickly wearing out but as of late 2018, the quality of the material used to make the pawl assembly has apparently improved. I suggest that pilots use only the smallest amount of grease – it just gums up everything and makes a sticky mess that must be cleaned up next time. Lubricant has zero effect in improving the wear of these parts. They should be considered consumable items, like the spark plug. We hope Polini will do a major re-design of the starter so that it does not wear out so quickly and more resembles the Top 80.
If modification [b.] above is done, pilots will only have to remove the starter from the engine, undo the center starter screw, and install the pawl holder kit from step [c.] The engine will be good to go for another 25-50 hours. How do you know when to replace the parts? The starter will no longer work.... It is a good idea to keep an extra kit around. Remember that you are wasting your time if you do not secure the Flash spring in step [b.] above.
Make certain that the center threaded hole in the starter is absolutely clean of oil/grease by using brake cleaner and air. If there is but a trace of grease/oil on the screw or in the hole, the threadlock will not hold. Here is what happens if you are not careful to clean things. You will be flying along and your engine will make a horrible noise as the cooling fan eats up starter parts.... It will continue to run but there will be no cooling and the engine will quickly overheat.
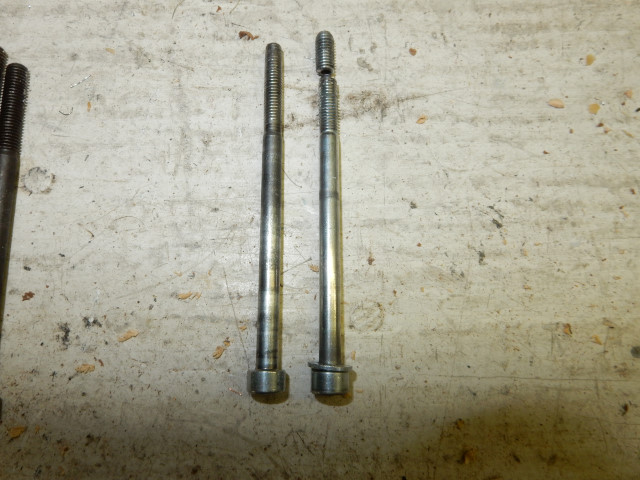
2. Weak mounting structure
Pilots in the normal course of starting the engine may also pull the lower starter housing mounting screw right out. Sometimes, the bolt will shear at the threaded end, as on the right. As of 2018, this problem still exists.
There are (4) starter mounting screws (not shown) – (3) 5mm x 80mm and (1) 5mm x 25mm. However, the bottom 80mm screw must be replaced with a 90mm screw, washer, and locknut. This is because the threaded hole for this screw is too shallow and flimsy to withstand the starter forces for any length of time whether a clone starter is used or the Polini OEM. The 90mm screw will extend beyond the existing threaded hole so a washer and locknut can be installed to greatly strengthen the screw's anchor.
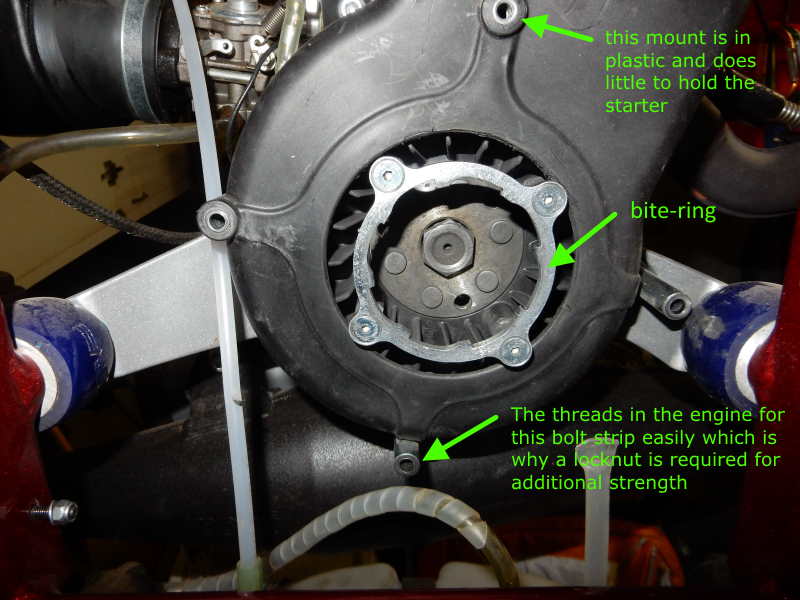
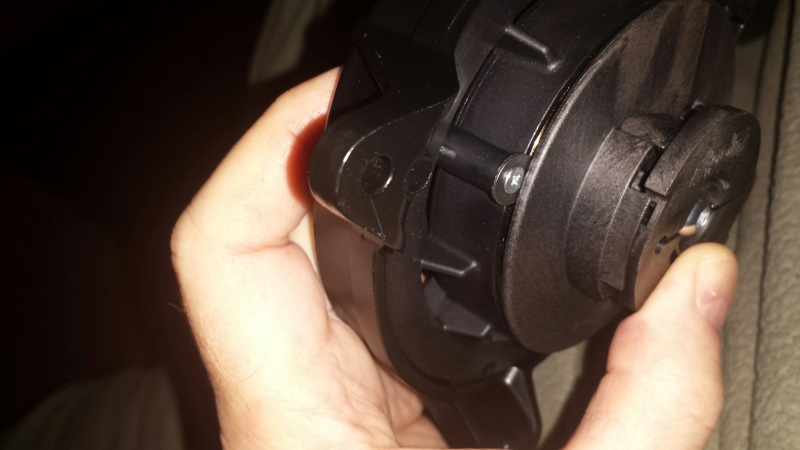
The mounting points for the Flash starter. The top mounting point can twist in the plastic cooling housing and make the screw difficult to remove.
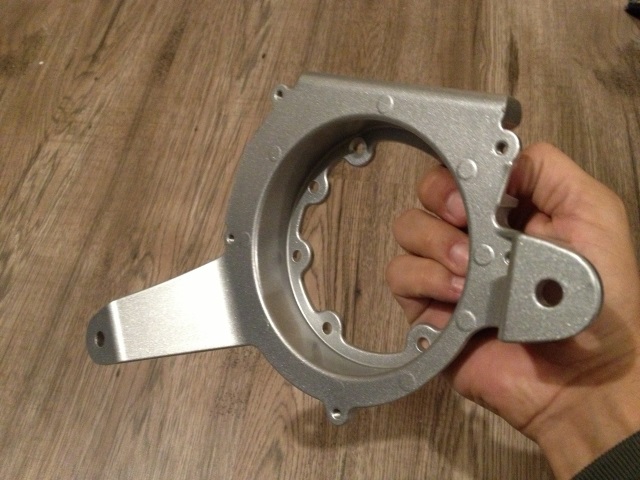
Below is a photo of the Polini Flash starter mount reinforcement. It helps prevent the movement of the starter when it is pulled – and the stripping/shearing of the existing bolts and mounting points. However, it does nothing to prevent the disintegration of the starter itself. This part is not available in the Western Hemisphere at this time. If the lower mounting screw is replaced with our special screw and locknut, the starter should not come loose as easily. So far, the starters on our engines have held steady without the addition of this reinforcing plate. But this is the least of the problems with the Polini starter.
3. Starter cord
The OEM starter cord wears out quickly. Instead, use a Dyneema cord. It lasts forever and is designed for this sort of use. It is available from Miniplane-USA. Scroll down to "Top 80 Starter Cord, Dyneema 1.25m". It will also work in other Polini Thor engines. However, be sure to cut the new cord to the exact length of the cord in your starter. Having too long a cord can result in the main spring being yanked out of its anchors.
4. Pulley failure
I do not know if other frame manufacturers use the same pulley brand (Viadana) as Miniplane does. This pulley is of poor quality. The starter cord can easily cut into the rotating part of the pulley seizes only slightly. They are guaranteed to fail after a short period.
Below is a photo of a new OEM pulley that was destroyed by the starter cord on a Thor 130. The plastic ball bearings had high friction, preventing the pulley from turning. The movement of the cord around the pulley quickly cut a groove in it. This pulley was not designed for the load.
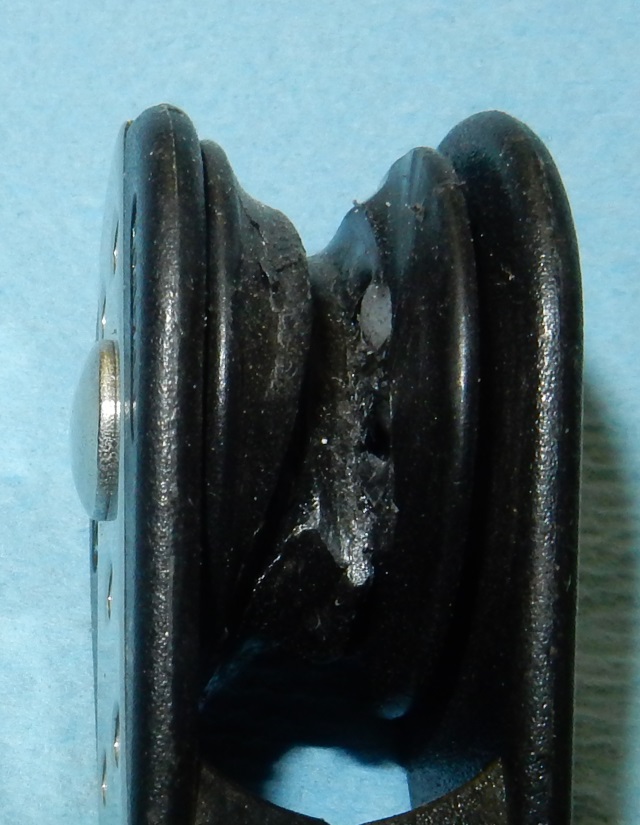
Replacing a failed OEM pulley with another OEM pulley is useless as it will just fail again.
Pilots annoyed with the poor
quality pulley from Miniplane can purchase the Harken 082 Single Bullet Block
for about the same price and replace both the upper and lower pulleys.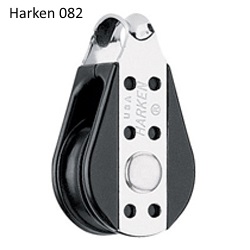 However, if you use the Harken 082 for the lower pulley, it is not as easy to remove as the Viadana because the Harken does not have a shackle. You will have to unscrew the anchor to
disconnect the starter system from the frame. This is a small inconvenience compared to the expensive (2X) Harken equivalent to the lower Viadana pulley, the
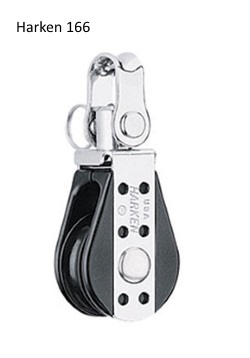
Harken 166 Bullet Block Single with Swivel.
The Harken pulleys are particularly designed for high loads (136 kg/330 lb.) and rough use. They will NOT fall apart like the Viadana pulleys.
However, if you use the Harken 082 for the lower pulley, it is not as easy to remove as the Viadana because the Harken does not have a shackle. You will have to unscrew the anchor to
disconnect the starter system from the frame. This is a small inconvenience compared to the expensive (2X) Harken equivalent to the lower Viadana pulley, the
Harken 166 Bullet Block Single with Swivel.
The Harken pulleys are particularly designed for high loads (136 kg/330 lb.) and rough use. They will NOT fall apart like the Viadana pulleys.
The Harken pulley (block) should never wear out. If you purchase the OEM, it WILL wear out quickly.
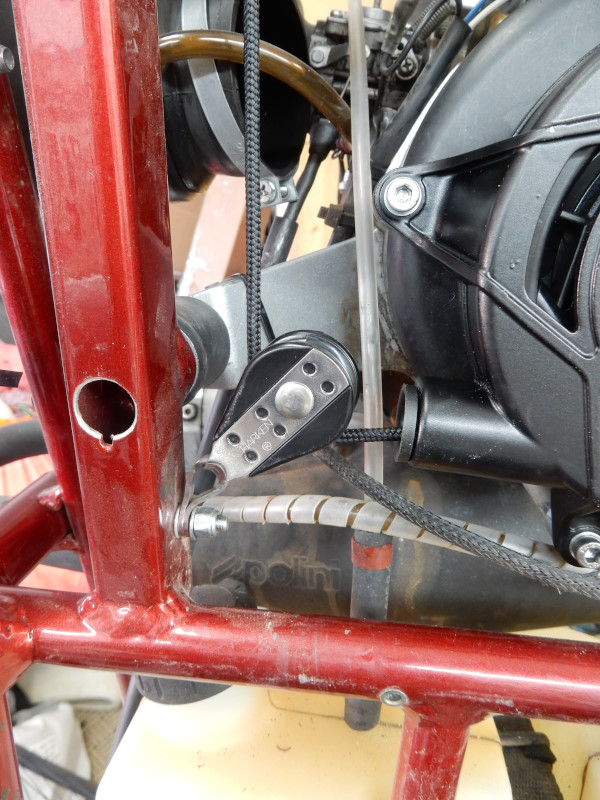
The Harken 082 installed adjacent to the starter (lower pulley) on a Polini Thor 130.
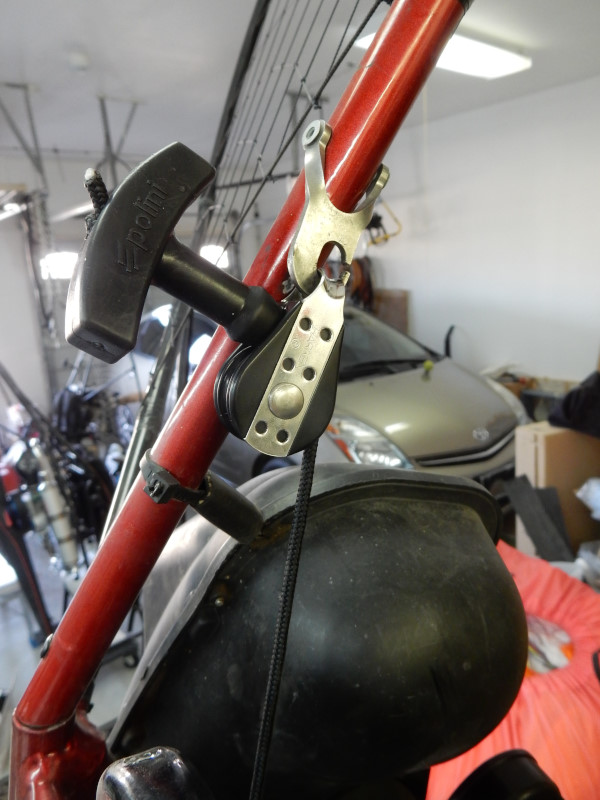
A Harken 082 on the upper pulley. The Harkens are slightly larger than the Viadana.
E. Lowering engine compression
Most pilots do not need every bit of the power these engine can produce or, rarely need it. The easy way to reduce the compression and wear/tear on the starter, electric or manual, is to put an aluminum washer under the spark plug. We put a 2mm washer under the plug of a Thor 130 and this greatly helped. Along with our CRV (compression relief valve), starting is easy and reliable. Contact us if you need the washers.
The Polini Thor engines are among the quietest and smoothest running of all paramotors and why we created these pages to help improve them.
![]()

