


Polini clutch
by Had Robinson
updated June 25, 2021
Introduction
The Polini clutch on the various models has the same overall design. It is a (3) part wet-type clutch.
The clutch has an approximate maximum life of 250 hours. What wears out are not the surfaces of the clutch and bell housing but the metal surfaces that hold the clutch shoes in place to the clutch hub. On the Thor 190 and 200, individual parts of the clutch may be replaced. On the 100 and 130 models, individual clutch parts are not available.
Service
Service must be performed on schedule because the clutch runs in oil and particles from normal wear of the clutch face get trapped in the oil. If pilots notice that the oil is black when changed it means that they are not changing the oil often enough. The specifications page gives the correct type and schedule for changing the oil
Drag
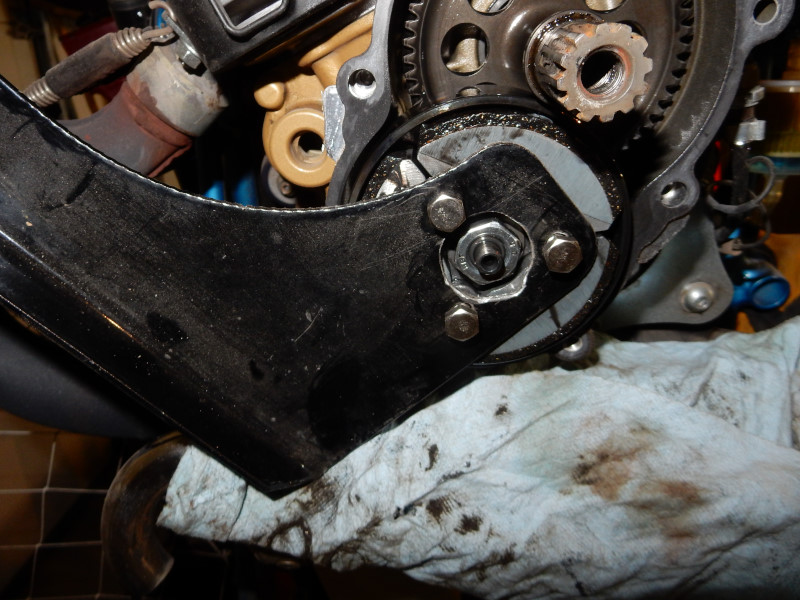
If the clutch drags, it should be serviced immediately to discover why it is dragging. Wet clutches will sometimes, as here, drag slightly due to the presence of oil between the bell housing and the clutch shoes. Drag from this cannot be fixed. If the propeller can be easily held in place at engine idle we know that the drag is caused by the clutch oil. If it requires any force to hold the propeller, there is a serious problem with the clutch internals and is usually caused by one or more of the nuts coming loose that hold the clutch shoes and springs to the clutch hub. Unfortunately, Polini is careless with the use of threadlock on important fasteners in their engines and pilots are plagued with things coming apart at the most inconvenient times.
Clutch Service
Special tools are needed to service the clutch. Because Polini tools are not readily available in the U.S., pilots will have to improvise or make their own. In particular, you must make a special bracket out of a flat piece of thin steel to hold the clutch when loosening and tightening the clutch nut. Unlike the Top 80, there is no other easy way to hold the clutch for removing and installing the nut on the end of the engine shaft.
1. Drain the oil from the clutch. Remove both of the plugs.
The fill plug has a flimsy fiber gasket that will break quickly after it is removed a few times. Do not waste money and time getting another fiber gasket but use a 11.8mm x 16.6mm x 2.4mm O ring, instead. Harbor Freight (USA) has an inexpensive O ring kit (#67580) with every O ring anyone could ever need. When reinstalling the fill plug, do not apply more than a Newton meter or so of torque – just snug it enough so that it does not loosen. Always give things like the fill plug an eyeball before flying because such parts can loosen.
Pilots have cut the tip off an ordinary 4mm hex wrench to remove the drain plug so that they do not
have to remove the muffler assembly. However, it only takes a few minutes to remove the muffler assembly and it is much easier to drain the oil. Use a piece of PG line to
stretch and
remove the exhaust springs. DO NOT USE PLIERS! Use PG line (best) or aircraft wire to secure the springs
if they break.
2. Remove the hub. Remember that the bolt for the hub is reverse threaded. A sturdy oil filter wrench or a chain wrench (my favorite) will hold the hub without damaging it. Alternately, the propeller may be left on and it can be used to prevent the hub from moving.
3. Remove the exhaust assembly. It is easier to drain and work on the clutch if this is removed. Use a piece of paraglider line or Dyneema to stretch and remove the springs. Remove the two button-head screws that face towards the rear of the engine.
4. Remove the (8) bolts that hold the outer half of the clutch casing. The lower (3) bolts are the shortest. The middle (2) bolts are the next longest and the (2) bolts just above them are a bit longer. The very topmost bolt is the longest of the (8).
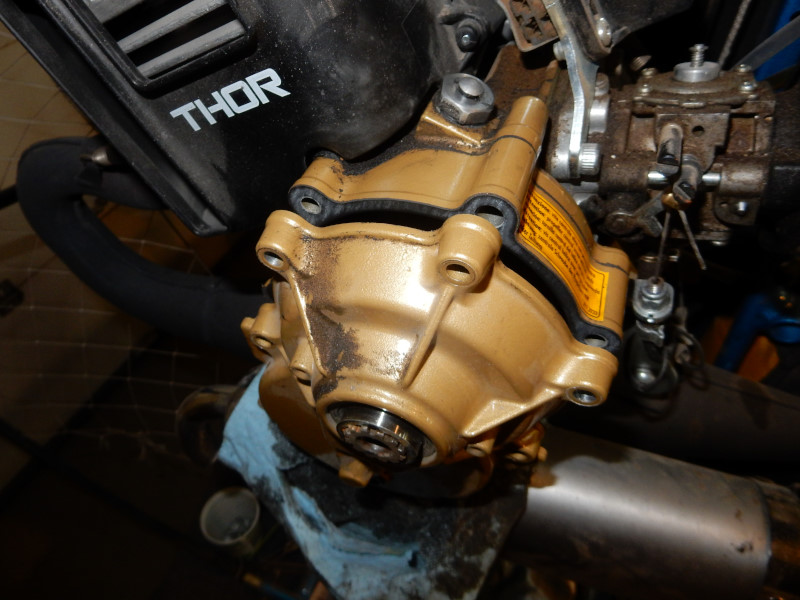
5. The outer casing should slip right off. If you are careful, you will not damage the gasket so it can be reused.
There are tabs on the outside of the casing where a piece of steel plate can be inserted to GENTLY pry the casing off, if needed. A screwdriver is too thin and could damage things. It should NOT be forced off! If it does not come right off, there may be corrosion on the propeller hub shaft that is holding it. Use some penetrating oil to help. Whatever you do, do not pry on the face of the casing. If you do, it will leak!
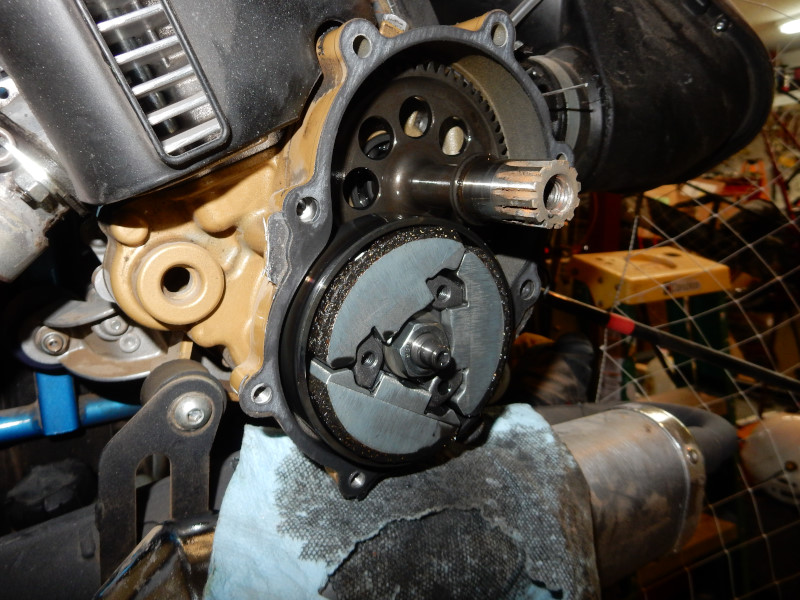
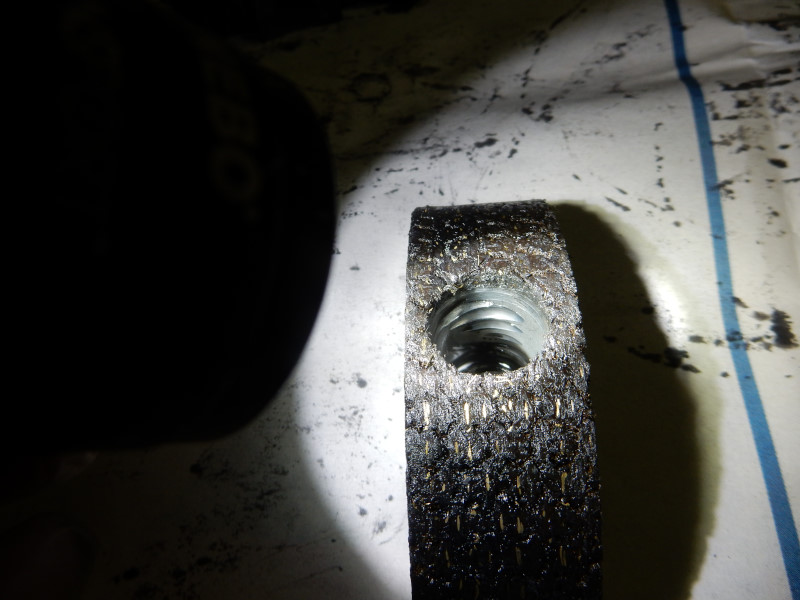
This clutch failed from one of the clutch shoes coming loose (clearly visible in the upper right of the photo below by the extra space between it and the other two shoes). The nut that held the shoe to the clutch bracket did not have threadlock on it. It would be only a matter of time until the nut came off and the shoe touched the clutch bell – and began to drag. Polini uses locknuts but they are insufficient to hold in such a high stress environment.
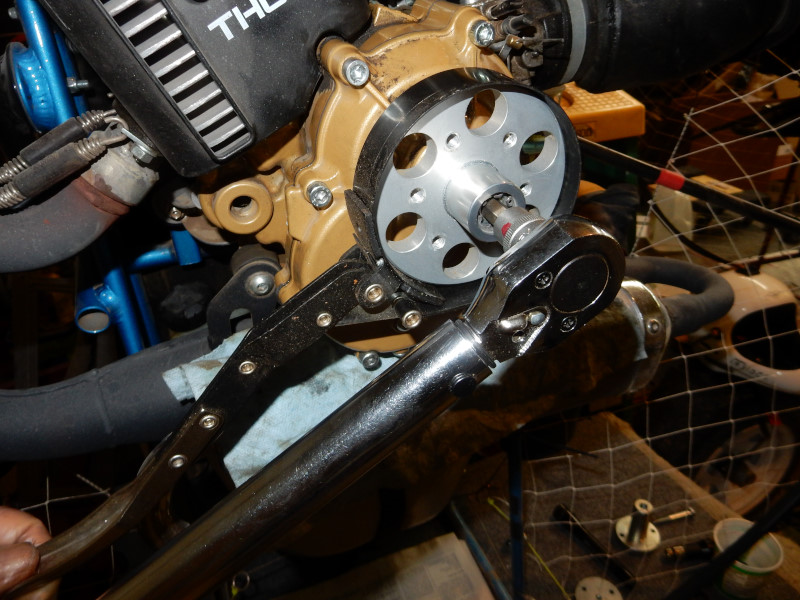
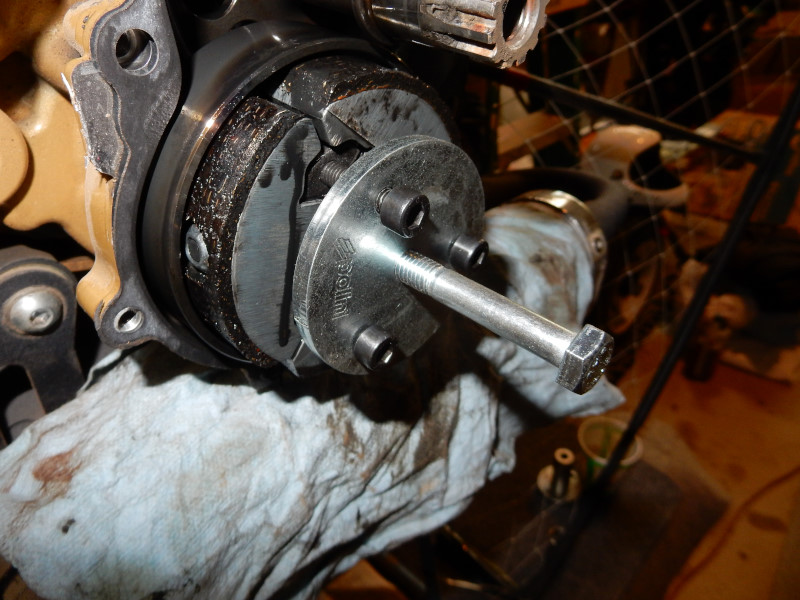
6. Affix the special tool (this one is homemade) to the clutch and remove the nut. This tool is the only special one needed to service the clutch.
7. The entire clutch should easily slide off the shaft. If it does not, you may need a small gear puller. Keep close track of the orientation of the clutch and the special tempered and flanged washer that goes under the nut. DO NOT LOSE THE WOODRUF KEY THAT SITS IN A SLOT ON THE DRIVE SHAFT!
The clutch below required the correct sized puller to remove it from the engine shaft. The puller here is the official tool from Polini but it must be ordered from Italy.
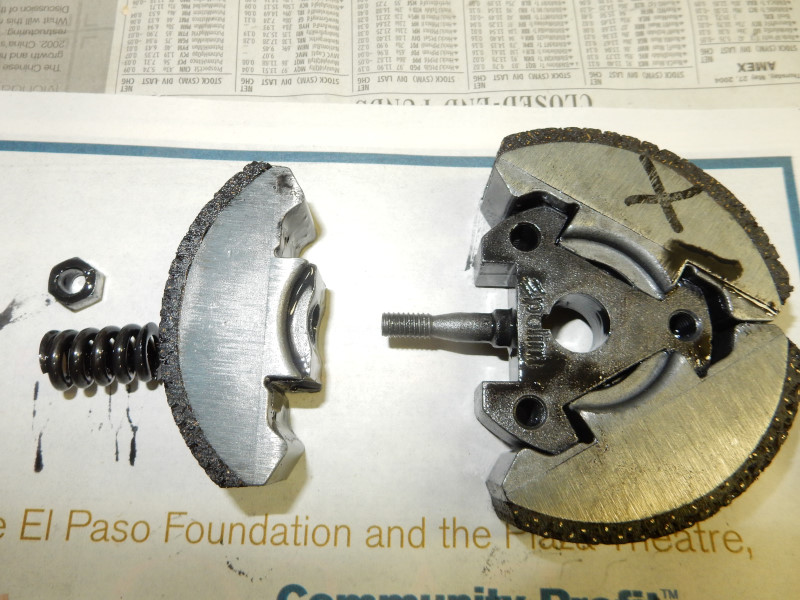
8. Examine the clutch carefully. The nuts should be even with the ends of the studs coming out from the center of the clutch. If the faces of the clutch parts are damaged, they must be replaced. On the Thor 190 and 200, individual parts of the clutch may be replaced but not on the 100 or 130 models.
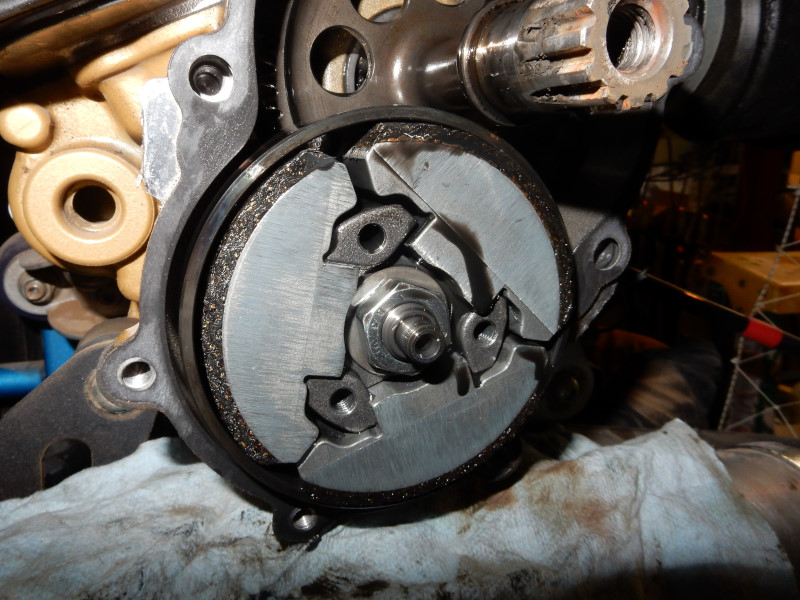
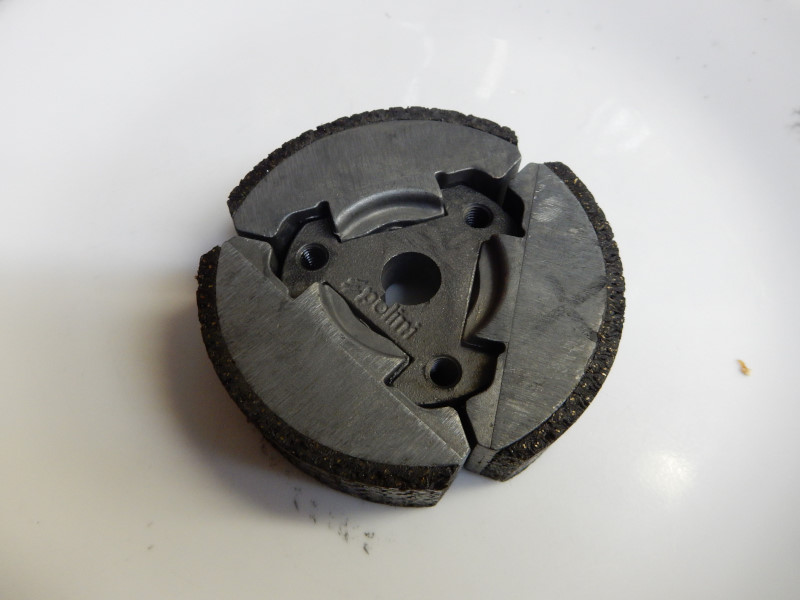
Here is a photo of the internal structure of the clutch. As the metallic parts of the shoe wear against the inner clutch hub, the force on the stud increases more and more, eventually breaking it off the hub or bending it. In either case, the clutch will begin to drag at idle.
Below is a view of the loose (and now damaged) locknut that was supposed to hold the shoe to the clutch.
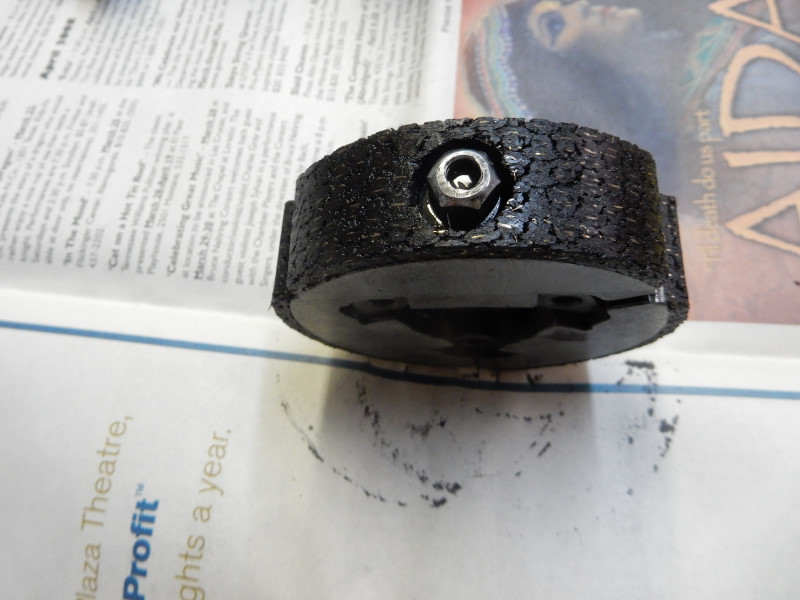
The photo below shows the wear that the clutch experiences. The tempered steel spring grinds away over time at the soft metallic parts of the shoe. When this happens the shoe is no longer perpendicular to the mounting bolt and the trailing clutch tip will contact the clutch bell and cause the propeller to turn at idle.
9. If the clutch has been dragging and the nuts that hold the shoes in place are intact, the shoes must be replaced. If the shoes could be rotated 180º and reinstalled, we could get double the life out of the shoes but this is not possible.
A properly assembled clutch. Note that the Polini logo and the rounded inner faces of the clutch shoes MUST be on the same side.
10. Even if the clutch looks in good condition and does not drag, it is a smart move to disassemble it, clean the parts with mineral spirits or brake cleaner, and reassemble it using RED threadlock on the nuts and studs. This will insure that the most common point of failure with Polini clutches does not occur.
11. Assembly of the clutch is the reverse. The clutch face that has the Polini logo faces the engine. Be CERTAIN that the convex side of the special washer faces the clutch. This washer has two sides.
If you get any of this mixed up, the clutch will drag. It is a good idea to be sure that the clutch moves freely before installing the outer case.
Torque all nuts and bolts to specifications. Be extremely careful tightening the 6mm bolts that hold the casing on. It is easy to strip the aluminum threads in the engine crankcase unless a torque wrench is used.
![]()

