


How to fix mechanical speedometers
by Had Robinson
updated October 21, 2021
We love our Toyota Tacoma that is used in our school and when visiting sites. It is the vehicle of choice for many hang gliding and paragliding pilots.
The problem
Nearly 100% of all mechanical speedometers have the same problem. The bearing that houses the rotating part of the speedometer fails/becomes noisy and/or jerks around because of a lack of lubrication. It is possible to fix this (but only briefly) by applying copious amounts of light machine or sewing machine oil to the base of the bearing where the flexible shaft housing is attached.
As often as not, someone will think that the flexible shaft going to the transmission is sticking and causing the problem. This is rarely the case. Do NOT apply grease to the flexible shaft or pour oil down the housing! This will cause the flexible shaft to stick and bind, even jamming it. Using anything other than 100% pure powdered graphite in the housing will make things worse, especially the use of grease. If the flexible shaft has never been removed, disconnect the lower section of the shaft housing from the transmission, connect a drill to the flexible shaft, and pour mineral spirits down the upper opening while slowing turning the flexible shaft. This will flush grime and gunk from the shaft housing. Catch the mineral spirits with a container. Now remove the flexible shaft and thoroughly clean it in a bowl of mineral spirits. Use compressed air to flush any remaining spirits from the shaft housing. Dry the flexible shaft. Re-insert it in the housing while adding copious amounts of 100% pure dry graphite to the shaft housing. This fix should last for years.
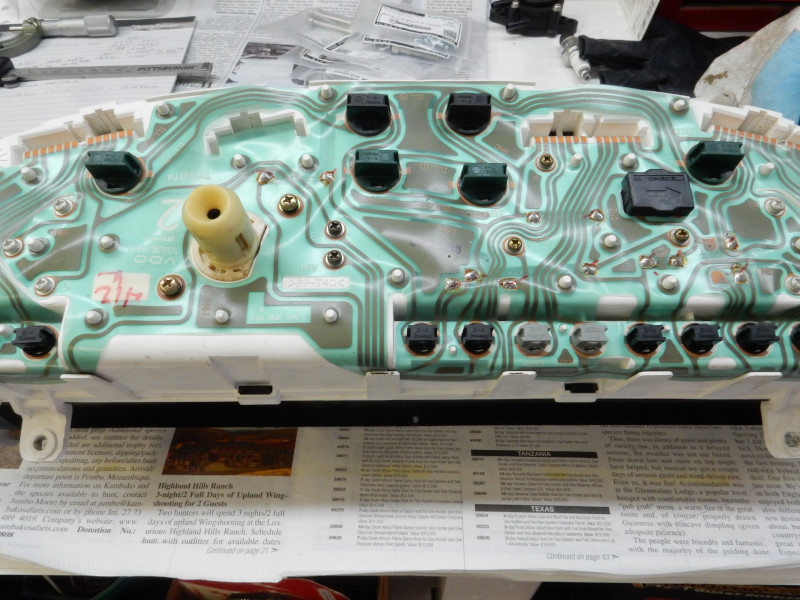
The speedometer below is from a Toyota Tacoma. Other makes and models that have mechanical speedometers are similar. Some of the bearing housings are entirely metal, some plastic. The purpose of this fix is to save $500 or more by fixing the #1 problem on vehicles with mechanical speedometers. The lubrication with this fix will usually last for many years before you will have to add oil again.
Parts needed:
- 100% pure powdered graphite
- Light machine oil, air tool oil, or sewing machine oil (the best)
- Cotton swab/ball or a piece of felt
- mineral spirits
Tools needed:
- 1/8" drill bit (this bit will be sacrificed!)
- 1/4" drill bit
- Xacto razor knife
- a drill press (much easier to use than a hand drill)
Here is what to do:
Instructions for removing the speedometer on an older Tacoma: Step 1 Step 2
- Remove the speedometer from the vehicle. This is often the most difficult task to do.
- If anyone has ever put oil or grease in/on the flexible shaft going to the transmission, the flexible shaft must be removed and thoroughly cleaned of any trace of grease or oil.
Even if you do not suspect there is any grease/oil present, it is a good idea to complete this step anyway. The best way to clean everything is to disconnect the flexible shaft
housing at both ends. Put the bottom end in a small can, attach a variable speed drill to the flexible shaft at the speedometer end, and pour mineral spirits into the flexible
shaft housing while turning the shaft slowly with the drill. You may need some sort of funnel/tube arrangement to ensure the mineral spirits go down the housing and not
everywhere else. It may take a cup or two of spirits to completely clean the housing and the shaft. When finished, pull out the shaft and dry it with compressed air.
Do the same for the housing. There must be no mineral spirits left in/on either. Use 100% powdered graphite (NOT THE LIQUID KIND!) to cover copiously the shaft as you feed
it back into the housing. Use plenty of graphite. It never gets sticky/gooey nor does it collect dirt.
- Once the shaft and housing are clean and lubricated with graphite, you can repair the speedometer or, really, lubricate it so it will work for another 5-10 years. Below is a
typical Toyota mechanical speedometer. The bearing (black arrow) that causes the problem is located right where the shaft housing attaches to the speedometer assembly.
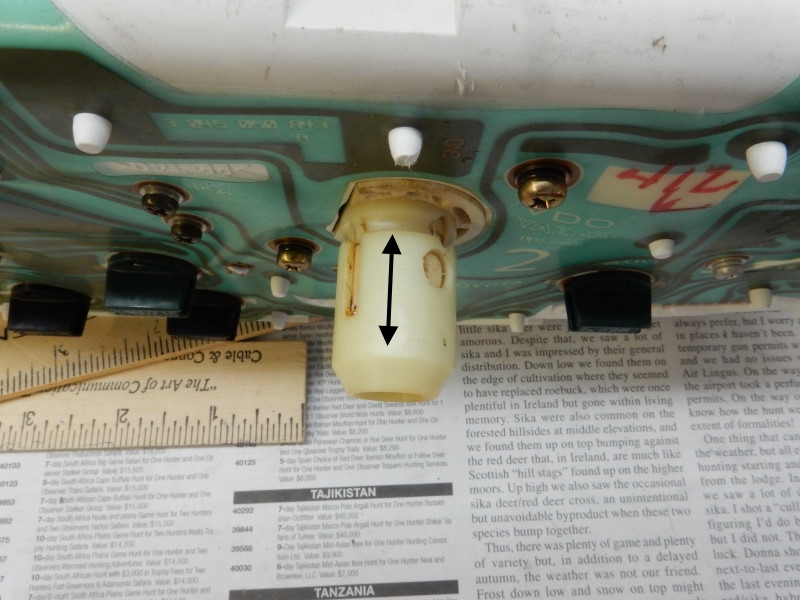
- Using the drill press (preferably) and the 1/8" bit, drill a hole approximately 1/2 or 2/3 of the distance from the end of the bearing towards the speedometer housing. The
exact location of the hole is not critical. The bit must be sacrificed because you must create the 1/8" hole all the way down to the rotating shaft which is made of hardened
chrome steel. You will know when you have hit the shaft. The bit will make a slight hole/dent in it. This does not matter. Once the hole is made with the bit,
it will be very small right at the shaft. Use the razor knife or a similar tool to widen the hole at the base to the width of the bit. This may take some time. Do no
worry about scratching or harming the shaft. It does not matter because only a small part of the shaft (and bearing) will be
damaged. It is also possible to use the sacrificed bit by grinding the face of the bit flat which can then be used
with the drill to cut away the rest of the plastic or metal housing.
After the 1/8" hole has been made, use the 1/4" bit to enlarge the hole all the way down so it looks like the photo below. The 1/4" hole is the cavity in which you will stuff the cotton or felt. The outside white shell is less than 1/16" thick and will rotate. The cotton/felt acts like a reservoir of oil for the shaft. Before you put the cotton/felt in the hole, fill it about one half with the oil and let it soak in to the bearing. This may take 30 minutes or more.
Stuff the cotton/felt tightly into the hole you have made. The outside shell can be rotated about 45 degrees which will prevent the cotton/felt from falling out.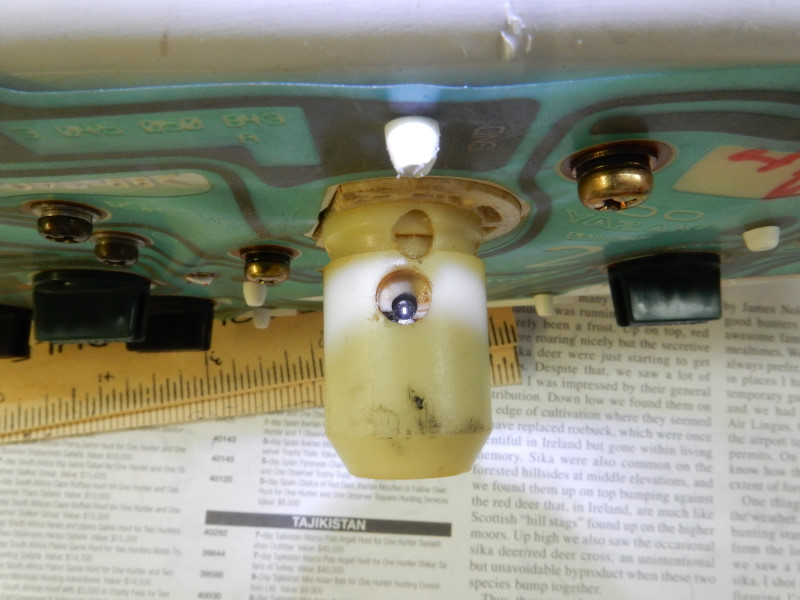
- Soak the cotton/felt with oil and then rotate the shell to help seal things up.
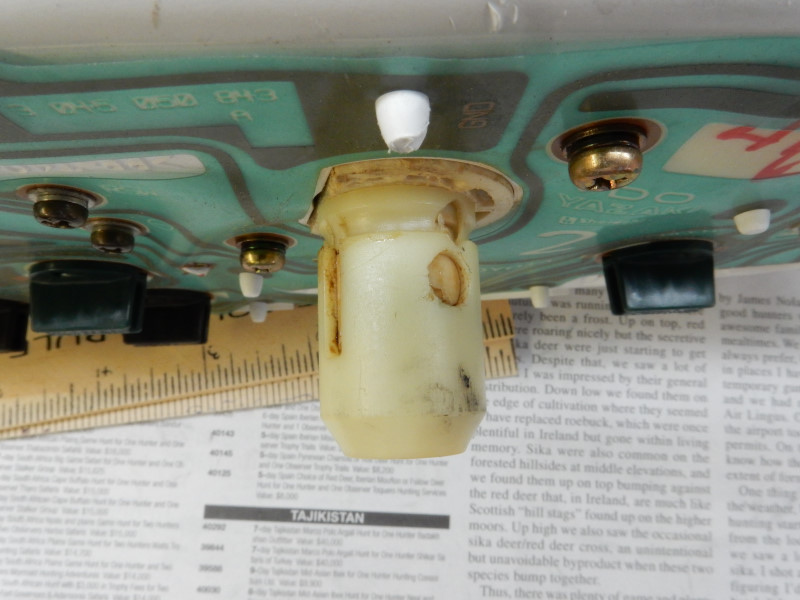
The location of the bearing on other speedometers is basically the same. The important thing is to make a hole that has enough oil in storage so that the shaft is lubricated for many years (if you keep your vehicle a long time). If the speedometer ever gets noisy or jerky, you will know what to do.
![]()

