PROPELLER Information
by Had Robinson
updated August 20, 2022
1. DUST
Dust, dirt, sand, and small rocks sucked through the propeller will take the finish off and eventually ruin it. On wooden propellers, the exposed bare wood can absorb moisture and warp it. When you start and run the engine keep it away from the ground as much as possible. Avoid accelerating until it is on your shoulder. Note that placing the motor on your back is less dangerous than placing it on the ground. Be careful to counter prop-thrust by securely grasping the engine frame and leaning against it. Flying at a beach can quickly damage a wood or carbon fiber propeller. If a pilot must have fun at the beach, he should launch into the wind (!) and apply as little power as possible until well away from the sand. Otherwise, the propeller will be sand blasted. Note: It is advisable to attach a good air filter if flying near sand as it is particularly bad for the internals of any engine.
2. DANGEROUS USES
Resist the temptation to use a paramotor to propel a bicycle or a skate board. The bicycle wheels kick up dust and rocks which can reach the propeller and be sucked through it, damaging the propeller. Moreover, engine power is significant and you could have an unpleasant surprise when it's time to stop. (This advice is from Miniplane because noodle-heads have used a paramotor in lieu of a scooter.)
3. DAMAGED or UNBALANCED PROP
Do not fly with the propeller damaged or unbalanced. The blades are subjected to centrifugal forces of close to 2,000 G's. A difference of only 1 gram will cause intense vibrations of 2 kg or more at normal speeds and is sufficient to separate the frame welds or even the tubes. The studs that attach the redrive to the engine casing have been known to shear under sufficient load. These SS studs should be replaced with tempered steel studs for added strength. Note: Propeller strikes to the frame or the ground are more than sufficient to bend the hub. A bent hub will cause severe vibration and possible damage to other parts of the engine no matter how well the propeller is balanced. Always check the face and radial runout of the hub if you have a prop strike or the propeller vibrates no matter how carefully you have balanced it.
4. DAMAGED PAINT ON WOOD PROPELLERS
The propeller must not have any cracks longer than about an inch and should be inspected often. The paint must be intact over the surface of the propeller otherwise leaking oil can penetrate into the fibers of the wood making subsequent repairs impossible. Also, that area of the propeller can absorb moisture and may warp.
5. STORAGE OF WOOD PROPELLERS
When parked in a vehicle, it is advisable to keep a wood propeller in a horizontal position to prevent moisture near the vehicle floor from warping the blades. A perfectly centered propeller stored vertically can become quickly unbalanced in a hot car. High humidity can cause slight deformations in a new propeller. This can be compensated during the assembly by increasing the torque on the appropriate mounting bolt(s).
6. ATTACHING THE PROPELLER
Here are some tips on attaching the propeller, whether carbon fiber or wood. The steps are particularly for the Top 80 but other models are similar. Make certain that the hub is not bent or damaged.
Improperly attached propellers can self-destruct and damage everything in site, including the glider. Flying propeller fragments have also injured people standing nearby. In the photo below the pilot failed to properly torque the attachment bolts...
- Assembly order Miniplane has this order for attaching the prop: hub – prop – rubber disk – outer flange
for carbon propellers. For wooden propellers place the disk between the propeller and the hub. These are Miniplane's recommendations.
Other engines are similar.
- Vibration causes and "bolt failure" Most problems with propeller attachment issues and excessive
vibration are
due to pilots incorrectly attaching the propeller, damaged propellers
and/or hubs, excessive out-of-track and run-out, excessive bolt torque, and propellers with incorrect mounting dimensions. The center hole
on the propeller must FIRMLY fit onto the hub projection. It is
assumed that the propeller is properly balanced. I know of no one who has actually experienced failure of undamaged OEM hub bolts. I think it is some sort of rumor. In
comparison, head stud failure is common enough but those bolts are subject to greater forces.
- Face runout Test for face runout of the propeller by manually turning the propeller
blade so that each tip passes the same point with a tolerance of
less than a millimeter or two. The measurement is parallel with
the propeller shaft. If face runout is detected the hub could also be bent and must be checked.
This article has some good tips on minimizing propeller vibration.
- Radial eccentricity This measures the distance from the rotating center of the prop to the tips. They must be the same for each tip. This measurement is perpendicular to the
propeller shaft. This problem is much less common and serious than face runout.
- Correcting tracking errors Because the wood of the propeller is elastic, slightly varying
the torque of the mounting bolts may correct tracking errors up to 2 mm. Be careful NOT to exceed the maximum torque of the
screws (10-13 Nm) when correcting tracking alignment errors. Note: This
should not be done with carbon fiber propellers. If you use this method to fix tracking errors, use of blue threadlock would be a good
idea.
- Testing propeller function Accelerating the engine while it is on the ground may cause
strong vibrations even if the propeller is well balanced and centered.
This will lessen after placing the paramotor on your back and taking to
the air. There
will always be some vibration, including harmonic vibrations, caused by the
redrive.
- Bolt torque A torque wrench may have to be used on the propeller side as the wrench will not fit on the engine side unless the pilot has a metric crowfoot wrench. Use a hex bit with the torque wrench on the propeller
side and an end wrench on the engine side. Do NOT over-torque the attachment bolts. The correct torque is
10-13 Nm (or what is specified in the manufacturer's user manual).
Top 80: the rubber washer is needed to help absorb vibration caused by the propeller rotating in a different axis than the hub. No one needs to install the T-Nut system. It is Miniplane's solution to persistent false reports and rumors that the existing, undamaged propeller mounting bolts are so weak that they would shear on occasion – a ridiculous assertion to anyone who actually works on engines and transmissions. However, damaged or over-torqued bolts can shear and this is likely the source of this rumor. - Rubber disk placement See "Assembly order" above.
- Excessive out-of-track This and excessive runout are difficult to correct on a paramotor. If either is excessive test the hub with a dial micrometer to be certain that it is not the problem. If the hub is OK, pilots may have to replace the propeller.
7. PROP REPAIRS
Minor dings and chips to the propeller can be repaired in minutes by using cyanoacrylate glue (Super Glue) and ordinary baking soda (sodium bicarbonate) as a filler. However, a product is available called Q-Bond which works the same as Super Glue but includes a filler superior to baking soda.
- Put a few drops of the glue on the surface of the area to be filled
- Use masking tape to make a dam around the damaged area.
- Sprinkle baking soda or the Q Bond powder over the wet glue.
- If using baking soda, use your fingers to quickly press it into the glue. (Wear vinyl/latex/nitrile gloves to protect your fingers.) Blow off the excess baking soda.
- Repeat the above steps until you achieve the desired thickness. Be sure to soak the filler/baking soda with glue. Let the repair cure for a while.
- Use a flat file or a Vixen file (which is the best) to trim the repair. Then use appropriate grades of wet-type sandpaper. Sanding under a constant stream of water prevents the sandpaper from clogging while keeping the finish cool.
- Refinish as desired. Use a gray sandable primer, if needed, and then a finish coat.
Larger dings and chips may be be repaired with JB Weld 5 minute epoxy.
Major damage to a propeller is much more difficult to fix. I recommend Rick's Prop Repair in Amarillo, Texas (search FaceBook). He not only repairs them professionally but also balances them. When I got back a repaired propeller, it looked and ran like new.
If the structural integrity is weakened the the propeller can come apart at full speed. It is not only dangerous to any bystanders but also will most likely damage the hub. Sometimes, the broken-off propeller can go straight up through the wing, making a nice neat hole in it.
Repaired surfaces can immediately be painted with automotive nitro-type paint (it dries quickly and resists gasoline and oil). Do not use cheap spray paint e.g. Rustoleum as it will not render a flat finish, is difficult to wet-sand, and does not adhere well. If nitro paint is not available polyurethane paint can be used e.g. Valspar.
If you do not refinish the damaged prop (wood or carbon fiber) immediately, the waste oil from the exhaust can be absorbed by the damaged area and then it will be difficult or impossible to remove it. Paint will not stick to surfaces that have any oil residue on them.
8. PROP BALANCING
California Power Systems has the "Steve String Balancer" which contains a bubble level. The propeller must be balanced both in the long dimension (tip to tip) and the short dimension (leading edge to trailing edge). Start with balancing it tip to tip.
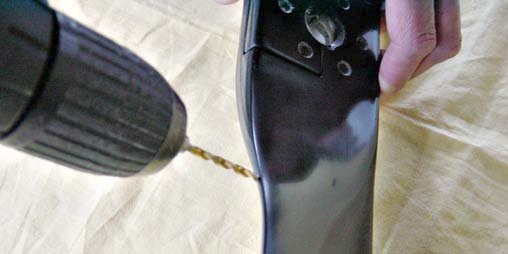
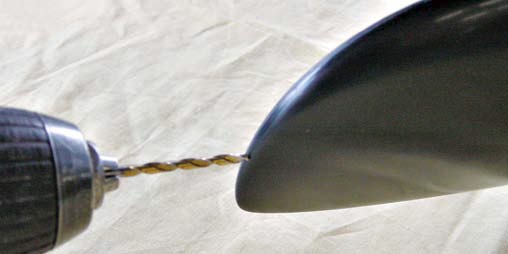
Minor out-of-balance can be corrected by applying thicker layers of paint on the lighter side. Note that you want to spray enough paint to make the lighter side/end heavier for the moment. When the paint dries, it will weigh less. If it is badly out of balance, holes can be drilled on the heavy side/end and then sealed with epoxy or Q-Bond, lightening the heavier side/end.
Balancing the short dimension of the propeller (leading edge – trailing edge) – photos courtesy of Fresh Breeze, Germany

Balancing the long dimension of the propeller (tip to tip)

Photos courtesy of Fresh Breeze
Remember that what seems like an out of balance propeller may be a damaged hub. There a number of outfits that can fix badly damaged props – Google "propeller repair".
![]()


