


Priming & starting paramotors with diaphragm carburetors
By Had Robinson
updated November 24, 2021
A. recirculating primer bulb B. no recirculating primer bulb
No engine will start easily unless the ignition and carburetor adjustments are in good order so be sure these are OK first if you have been having starting problems or it has been more than a year. The low speed idle adjustment is precise and needs to be accurate for the engine to start or run smoothly in the midrange. A broken core in the secondary wire, a fouled, old, or loose spark plug, or bad/old fuel will always make the engine hard or impossible to start. If it has been more than a year since the carburetor has been rebuilt, it should be done. All fuels are hard on the flexible parts of the carburetor, especially ethanol blends. Your cue that the carburetor needs a rebuild: erratic or difficulty adjusting the idle.
A. Recirculating primer bulb
Some newer Miniplane models do not have a priming lever but a special fuel recirculating primer bulb. This new system supposedly simplifies starting the engine. Actual experience has proven otherwise.... There are twice as many fuel lines of different diameters and lengths, including the primer bulb, that will fail, come loose, or leak. Hopefully, Miniplane will ditch this disaster for the tried and proven priming method on all earlier engines.
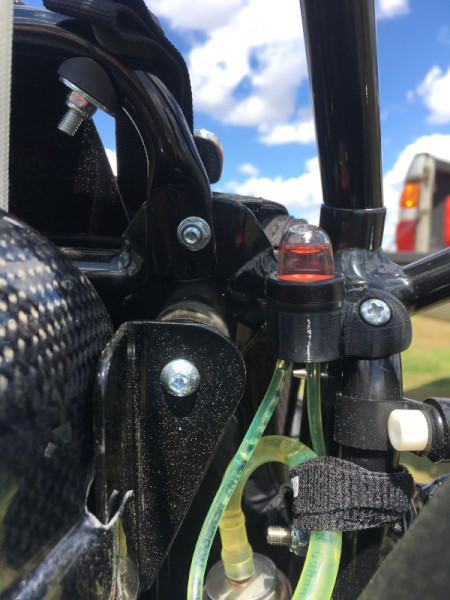
primer bulb photo courtesy of Ali Xavier
The priming setup circulates fuel from the tank up through the lines going to the carburetor. You may want to tear this system out and change things back to the original setup (see below). We have already had reports of the smaller fuel line splitting and leaking fuel. If you engine has this feature, perform these steps:
- Press the Priming Bulb from the SIDES, not the top with your thumb about 10 times. Hopefully you will see fuel come up to the carburetor in the fuel lines and fill the primer bulb. Note: You cannot flood the engine by squeezing the primer bulb.
- Apply full choke (close it completely) and briskly pull on the starter.
- As soon as you achieve the first burst from the engine (that it is trying to start), open the choke completely.
- Start the engine.
- Always let your engine idle a few minutes before going to full power.
B. No recirculating primer bulb
The following applies if your carburetor does not have the new recirculating primer bulb or something similar. This technique will not flood the engine. Pilots must be able to easily position the inlet side of the carburetor lower than outlet side.
Note: With engines where the carburetor is mounted vertically e.g. the Minari and Moster 185, a slightly different technique must be used – see below.
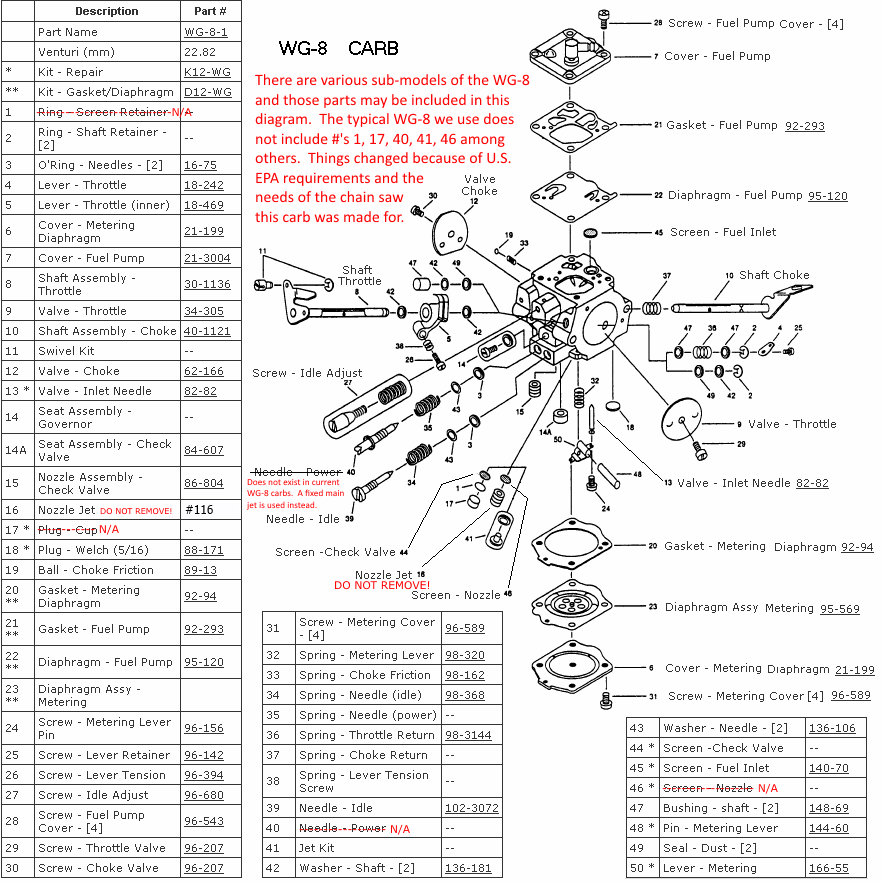
If you do not know the parts of a carburetor, it will help to study this diagram of the WG carburetor or the WB carburetor. Note that the diagrams are of generic WG and WB carburetors and that the actual shape of some parts of your carburetor may be slightly different, such as the metering diaphragm cover and the fuel pump cover.
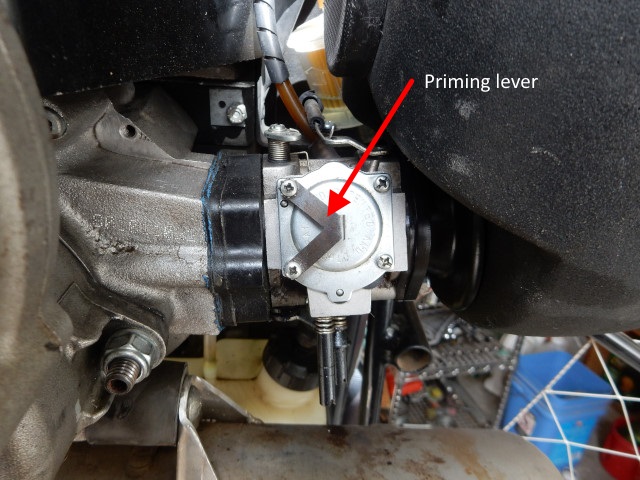
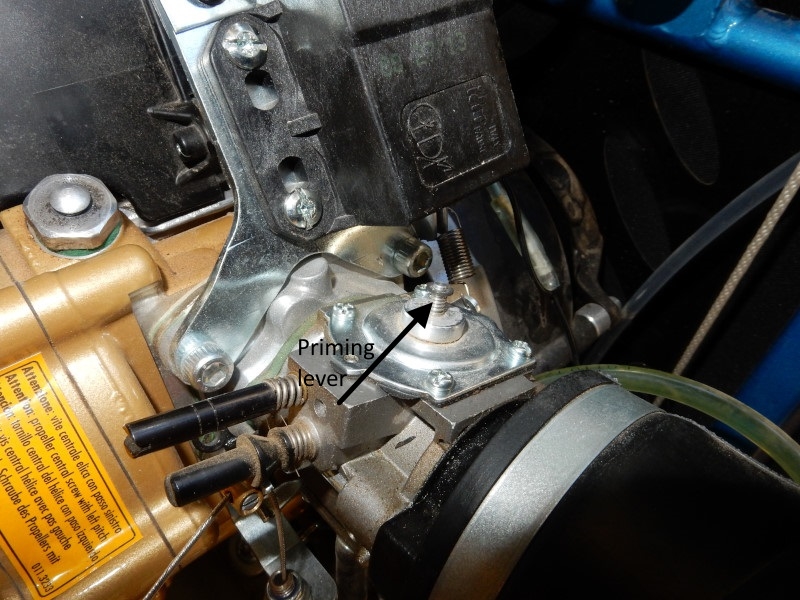
The priming lever (a.k.a. spring) is not noted in the official diagrams of the carburetors. Depending on the model carburetor, it may be missing entirely or look like either of the following photos.
If it is missing, use a broken toothpick to push down on the metering diaphragm beneath the cover. Thankfully, a pilot cannot easily damage the ML diaphragm by pushing on it through the hole. This is because the diaphragm will strike the carburetor body before the metering lever or other parts could be bent or damaged. It is recommended that a priming lever be installed to make priming easier.
Additionally, using the technique given on this page will also indicate that the fuel system is in good condition. (Go here to get more info on how to easily test the fuel system.)
Non-flash starters If your starter is not the flash type, a bit more strength is required. Proper priming is even more important to ensure that the engine starts the first time. The ignition timing on all 2 stroke engines is always advanced by 15 degrees or so (the plug fires 15 degrees before the piston reaches top dead center TDC). The engine may kick badly or be hard to pull through TDC. Because of this, the priming technique is more critical to make starting the engine easy. It is better to under-prime some because the "kick" will be weaker (less fuel). When pulling on the starter, pilots will find it may pull through TDC fairly easy and start if they go easy on the prime.
Of course, if the engine is flooded it will also pull through TDC easily. Pilots will have to experiment and keep close attention to how many seconds they press the priming lever down for. Start with just 2-3 seconds and work up from there. Speed does not help that much as the ignition systems will make a spark at very low rpm's. A steady pull is the best and it can be done the safest way by having the engine on the back. A clogged decompression port (DCP) will also make starting the engine very difficult. It can take (50) hours or less of runtime for the port to clog. Keep records of when it was last cleaned.
Leaks in any part of the fuel system will make the engine hard or impossible to start.
How to start a paramotor
Warning: If pilots must start the engine on the ground, always put the throttle hand on the engine frame in such a way that the sudden start of the motor does not cause the throttle to increase accidently. Larger engines can be dangerous is if they go to even 1/3 throttle.
Put the engine on level ground and ensure that the propeller is secured with a strap (engines with a clutch).
The engine can be hot or cold.
BE CERTAIN THAT THE THROTTLE IS IN YOUR HAND WITH YOUR THUMB READY ON THE KILL BUTTON. A run-away paramotor is exceedingly dangerous and terrifying. Pilots must always be ready to shut it down. (Don't ask yours truly how he knows this....) Kill switches can fail. This is why pilots should use their glider strap or a line to tie the propeller to the cage (clutched engines only). Miniplane-USA supplies propeller covers with a strap for this purpose. None of this is necessary, however, if the engine is started while on the back which is the best method for clutch-less engines.
The USPPA has these warnings about starting a paramotor.
- Choke – (if it has one) Make sure that the choke is fully closed. It makes the engine
easier to start, especially if it does not have the flash system or a decompression valve. If you want to know what a choke is and its purpose, visit the
choke page.
- Time limit – This technique is only good for about (4) minutes because the fuel will evaporate and the prime will be lost. Modify the times
given in the steps below for your particular engine, as needed.
- Fuel line to the carburetor – It must be visible so you can see when the fuel is clear of air or bubbles and a solid stream of fuel is entering
the carburetor. It helps to extend the priming tube with a 6" piece of 5/16" OD windshield washer tubing so the fuel line is more visible.
- Tilt the paramotor (horizontal carburetor only) – Facing the rear of the engine, tilt the paramotor to the right about 20 degrees so that the intake of the carburetor is just
pointing down from the engine side. If this is not done, the engine can flood. The principle is that extra fuel will run
harmlessly out of the carburetor instead of into the engine, flooding it. However, do not tilt it excessively because you want some fuel to be present in and about the carburetor throat.
- Blow into the priming tube on the fuel tank
as hard as you can. Use the tip of the tongue to hold the pressure. There has to be enough air pressure to raise the fuel in the tank 18"-24" (the distance from a nearly empty
fuel tank up to the carburetor on the engine). If you have a primer bulb, squeeze it repeatedly until resistance is felt.
- Minari, Moster 185, and others with a vertical carburetor – there must be fuel in the
lines and in the carburetor. If not, hold the priming lever down
while you listen for air hissing out of the idle progression holes. The moment the hissing stops, hold the priming lever down for
an additional 1/2 second. If there is fuel in the lines and in the carburetor, simply hold the priming lever down for 1/2 second. It is
easy to flood these types of engines. You will have to get familiar with how your engine works. How many seconds you need to hold the priming lever down can vary but you will learn how your
carburetor and engine function so as to get just the right amount of fuel in the engine to prime it.
- Engines with a horizontal carburetor – Push down on the priming lever (a.k.a. the "primer spring") on the carburetor for
3-5 seconds. Start with 3 seconds. Too little prime, the engine almost starts but does *not* smoke. If there are bubbles or no fuel in the line going into the
carburetor,
more time may be required to purge the fuel system of air. As you repeatedly perform this step, you will
become familiar with your engine and better able to adjust precisely the time needed to hold down the priming lever. If the air box is
removed, you can watch fuel dribble out of the carburetor (except the Minari and Moster 185 where it dribbles into the engine and floods it).
You will then be able to better determine how long to push the priming lever. As soon as the fuel dribbles out add a second or two.
If nothing happens you may not have blown hard enough into the priming tube or there are restrictions in the fuel system. (If there is no priming lever, order one from Miniplane USA or use a toothpick.) If you suspect that your fuel system is clogged, perform this quick test.
If you are using cheap fuel or the weather is hot, you may not be able to get rid of the vapor bubbles (not air bubbles) caused by negative pressure on the gasoline in the fuel system. (The FSM we are developing fixes this.) The bubbles can create vapor lock which causes the the engine to become starved for fuel so it will not start. Pouring cold water over the carburetor and fuel tank will fix this problem temporarily enough to start the engine and launch.
If the priming lever is held down too long fuel will harmlessly accumulate in the air box and/or run out of it. However, if there is a foam-type filter in the air box, the system will be more sensitive to flooding, even with this technique. If there is enough fuel that has flooded into the filter, the fuel vapor can saturate the space inside the filter so that the engine acts like it is flooded. In such a case, you may have to be more careful experimenting with the number of seconds needed to hold down the priming lever. If you see fuel dripping out of your airbox, remove it and then attempt to start it.
Note: the fuel filter will always have some air/fuel vapor in it. It rarely means that there is a fuel system leak.
THE ENGINE MUST BE STARTED WITHIN A FEW MINUTES OR THE PREVIOUS STEPS MUST BE REPEATED. THIS IS BECAUSE THE FUEL WILL EVAPORATE FROM THE CARBURETOR THROAT AND AIR BOX AND THE PRIME WILL BE LOST. - Slowly turn the
engine over 3-4 times with the manual starter. It takes little
effort if done slowly enough. This will charge the crankcase and cylinder
with the fuel/air mixture. If you have an electric starter, skip this step.
- Open the throttle
about one quarter but only after you first test it for function. ALWAYS SQUEEZE THE THROTTLE TO FULL A FEW TIMES AND FEEL IT RETURN TO IDLE. You
must be sure that the throttle is working properly. A stuck, wide-open throttle is one of the most terrifying things a pilot will ever experience.
- Non-flash starters – Pull slowly on the starter rope until the compression stroke of the engine is felt.
Wait a moment then pull smartly. If the engine has been fully choked, it should give a little burst but not continue to run. Fully
open the choke and pull the starter smartly. The engine should start. If there is no choke, it should start the first pull.
Flash starters – Pull smoothly and steadily on the starter to turn the engine over. NEVER YANK ON THE STARTER as this can break the flash spring. It should immediately fire and start running. Do not pull so far that the starter cord is pulled to the end. If it is pulled to the end regularly, full strength used, the pull handle yanked, or pulled repeatedly, the starter can be damaged. Remember that anything amiss with your carburetor or ignition is not cured by repeated attempts to start the engine.
Electric starters – Nearly all engines with electric start use the WB-37 carburetor which does not have a choke. Hold the start button down until the engine starts. Remember that electric starters on paramotors should not be engaged more than 4-7 seconds at a time (with a 30-60 second wait before the next try. It is very easy to burn up these expensive starters. Remember that hard starting is most often cured by rebuilding the carburetor.
If there is a trace smell of gasoline at the exhaust outlet, it is flooded.
Frustrated pilots routinely damage their starters trying to start flooded engines.
If an engine is mildly flooded, open the throttle fully and slowly and fully pull on the starter 5 or 6 times and then attempt to start it. If this does not work, remove the spark plug and crank the engine 5 or 6 times. Let the spark plug dry a bit, reinstall it, and try again.
If a pilot is careful, the starter will also last much longer – even the life of the engine.
![]()

