


Squish measurement and adjustment on 2 stroke engines
by Had Robinson & Gale Tyler
updated June 10, 2021
Squish is an effect in internal combustion engines which creates sudden turbulence of the fuel/air mixture as the piston approaches top dead center (TDC). In an engine designed to use the squish effect, at top dead center (TDC) the piston crown comes very close, (typically less than 1mm, to the cylinder head. The gases are suddenly "squished" out within the combustion chamber, creating turbulence which promotes thorough fuel/air mixing, a factor beneficial to efficient combustion. – from Wiki
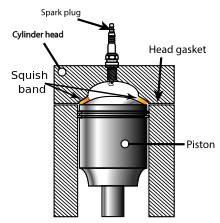 Squish is the clearance between the piston and the squish band inside the cylinder (see illustration).
It is a critical value because high squish velocity shortens combustion duration, staving off
pre-ignition detonation (knocking). However, if it is not set correctly, the engine can be damaged.
Squish is the clearance between the piston and the squish band inside the cylinder (see illustration).
It is a critical value because high squish velocity shortens combustion duration, staving off
pre-ignition detonation (knocking). However, if it is not set correctly, the engine can be damaged.
In most paramotors, the squish is adjusted by changing the thickness of the gasket that is between the base of the cylinder and the engine crankcase. However, changing the squish by using different thicknesses of the base gasket also changes the compression of the engine. A thinner gasket will raise the compression and decrease the squish. A thicker gasket will increase the squish value as well as lower the compression. Generally, it is better to error having a greater squish because it will decrease wear and tear of the engine.
A typical problem caused by having a low squish value is the loosening of the cylinder head nuts caused by pre-ignition detonation (knock) from the squish being set incorrectly, namely, having too little squish which effectively increases the compression of the engine.
There is no reason to check the squish unless the top end of the engine has been rebuilt or any of its components (head, piston, or cylinder) have been replaced. The presence of pre-ignition detonation (knocking) would also be a reason to check the squish value.
Cylinder gasket squish values
Here are the squish values of two common paramotors.
Top80 0.60mm-0.70mm (0.024"-0.028") Most common gasket sizes are .30mm & .40mm. Top 80 engines made before June 2003 require a squish of 0.80mm-0.85mm.
Minari 180/200 1.30mm-1.50mm (0.051"-0.59") – Here is Minari's instructions on how to measure the squish
For low octane fuel you may want to consider increasing the thickness 0.10mm - 0.25mm. Excessive gasket thickness is always better than too thin. Too thin a gasket can cause engine damage i.e. raise the compression and cause knocking/pre-ignition.
For other paramotors, check your owner's manual for the correct squish value. Some engine manufacturers e.g. Polini may not need to have the squish set and supply only a single gasket size. If your owner's manual does not mention a squish value then I would not be concerned about measuring or setting the squish for the that engine.
A. Special tools and parts needed
- Rosin core solder is best – available at Radio Shack or Harbor Freight.
- Caliper – The cheap digital calipers available at Harbor Freight are sufficient.
- Cylinder gaskets – If you are going to do this project, order in advance a selection of the common sizes for your engine. (For the Top 80 they are 0.30mm and 0.40mm. If you are unsure what size to order, 0.40mm would be the safest.) You should always measure the thickness of the received gasket and write the value with a pencil on the gasket. Gasket thickness can vary up to 0.06mm either direction. Gaskets are available from Miniplane-USA for various engines.
- A new cylinder head O ring or gasket. The pressures inside the cylinder are very high (over 1,000 psi) and using RTV or an equivalent to seal the gasket that is leaking will not work. Leaking head gaskets may damage the engine!
B. Measuring the existing squish
- Make a (2) strand "rope" of the solder about 4" long. It must be tight (10-25 turns/inch). Making a rope makes it easier to measure the thickness of the squished solder.
- Remove the spark plug.
- Insert the solder so that it touches the wall of the cylinder, where the squish band is.
- Gently pull on the starter so that the piston goes past TDC at least twice. Never pull on the starter quickly unless the primary wire is grounded with a jumper wire or the spark plug is connected to the secondary wire and is GROUNDED to the engine because you might burn out the ignition coil.
- Remove the solder and measure the solder thickness (the squish) with a caliper. Note: The very tip (0.1mm) of the squished solder will be thicker because of the clearance between the edge of the piston and the cylinder wall. Do not measure the tip but just inside it.
- Reassemble the engine.
C. How to determine the correct size of gasket to use
- Remove the cylinder. If a new cylinder and piston is used, do not put the ring on the piston. This will save trouble when taking the cylinder on and off.
- Remove the old cylinder gasket, if necessary, and then reassemble the cylinder WITHOUT THE CYLINDER BASE GASKET. Properly torque down the cylinder head nuts to the correct value for your engine. (Top 80 is 9 Nm.)
- Measure the squish per section "B" above steps 3-5.
- Subtract the measured value from the specified value. Use the higher specification (e.g. 0.70mm for the Top 80) because it is always safer to have too much squish than too little. The difference will be the thickness of the gasket needed. Note: the gasket will compress when the cylinder head and cylinder are torqued down so a thicker uncompressed gasket must be used. Gaskets compress to about 70% of the uncompressed (unused) value i.e. they compress about 30%. This must be calculated when determining the gasket thickness. For example, if a 0.30mm gasket is needed, install a gasket that is 0.43mm uncompressed (0.30 ÷ 0.70 = 0.43). Choose a gasket of the next greater thickness if you do not have the exact sized gasket that you need.
D. Reinstall the cylinder and head
- Reinstall the cylinder (with the piston ring if it was removed) with the correct gasket. Using sealant on engine gaskets is unnecessary.
- Note for engines that have an O ring between the cylinder and head: Install the cylinder head WITHOUT the O ring,
torque in a cross pattern in stages to the correct torque and measure the squish again. If it is within specifications, then remove the cylinder head and
reinstall it with the O ring.
O ring installation: if it is gently stretched, it will tend to stay in the groove in the cylinder head much better.
Remember: do not reuse an O ring or a head gasket because it will eventually leak. Glopping RTV on old gaskets and O-rings does nothing. - Torque the cylinder head nuts in a cross pattern in stages to the correct value. ALWAYS RE-TORQUE THE HEAD NUTS AFTER (10) HOURS. If this is not done, the head gasket may leak, causing a lean running condition.
-
Replace the spark plug with the spacer (if one is required) and torque it down to the correct value. You should be good to go.
![]()

